How to Collect Data in the system using the Quick Collect feature
This guide offers a streamlined approach to our quick data collection, enabling users to efficiently document client behaviors and skills without navigating through multiple screens. It highlights features like simultaneous data collection for maladaptive and replacement behaviors, quick data entry options, and real-time updates
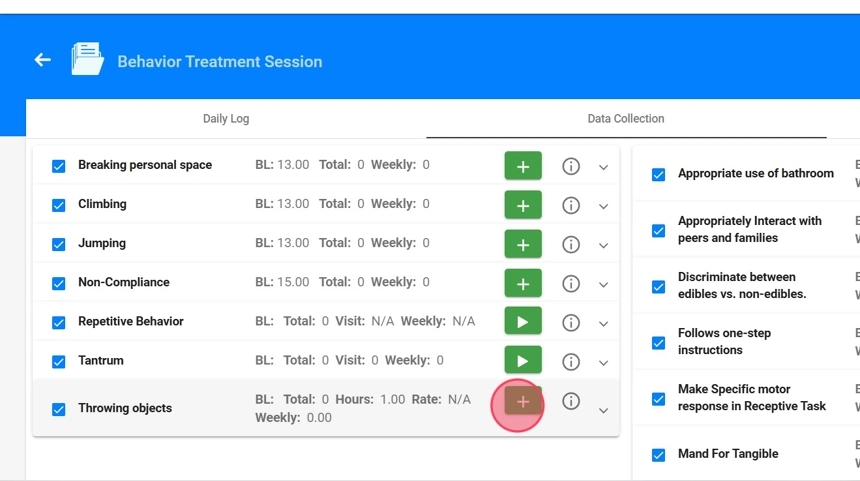
1. Data collection tab
1. After creating the session, click on the scheduled day to edit the note you wish to modify. Access the session note through the "Go To Report" icon.
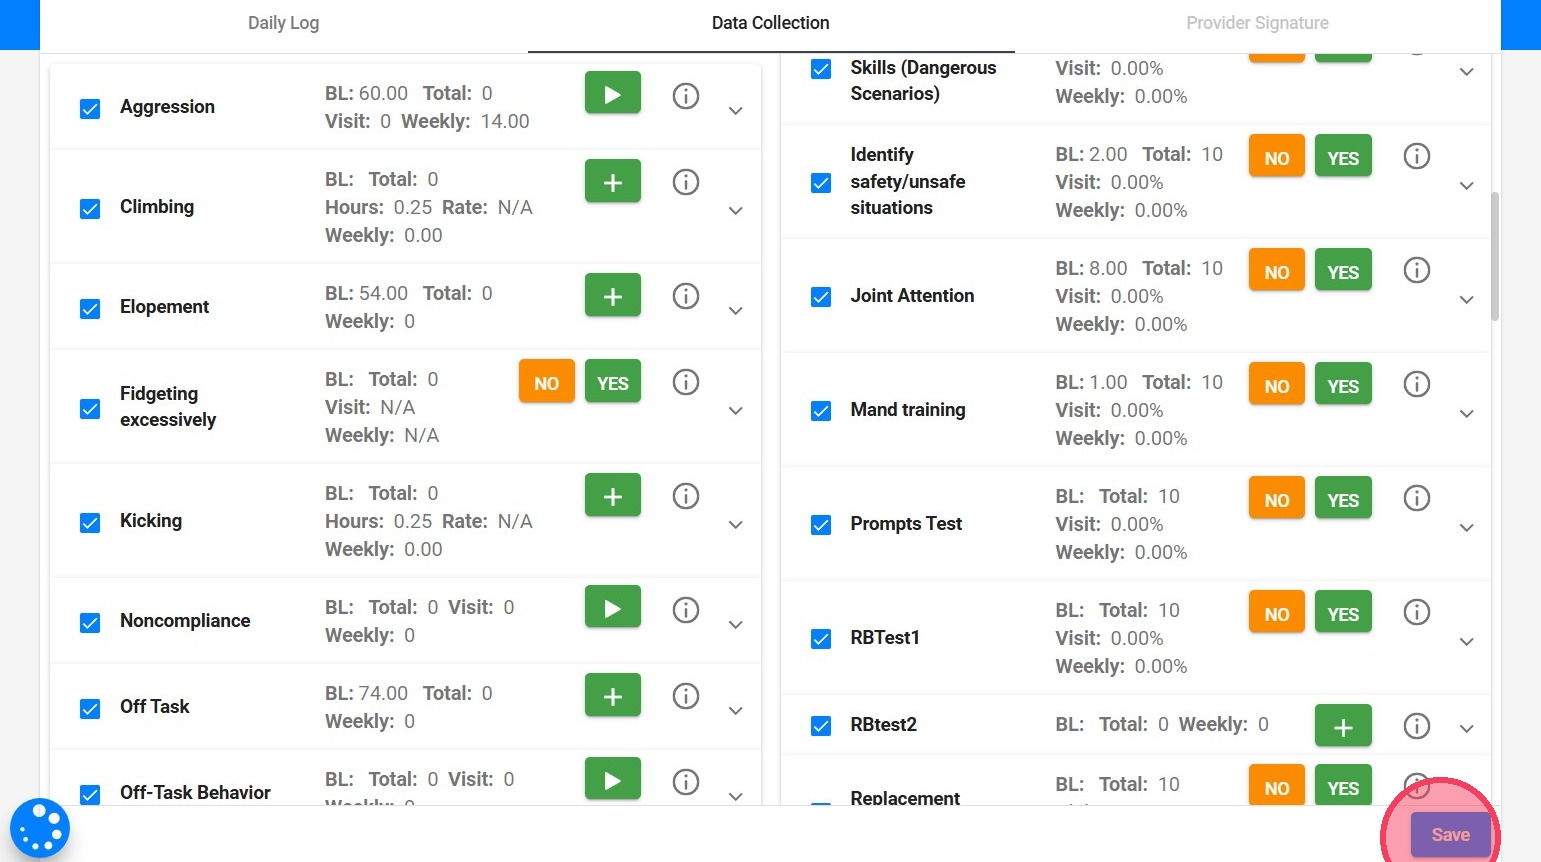
2. Click Data Collection. In this new view you will find:
-
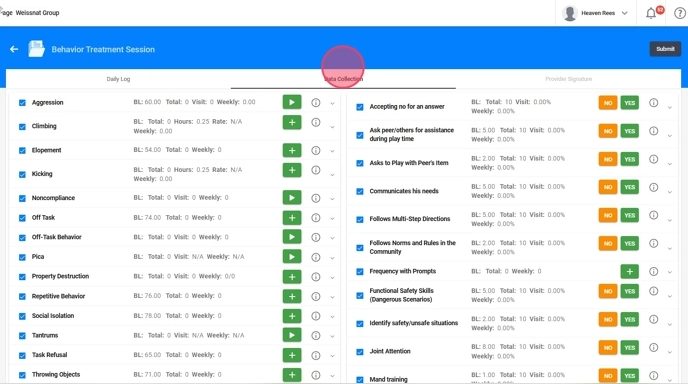
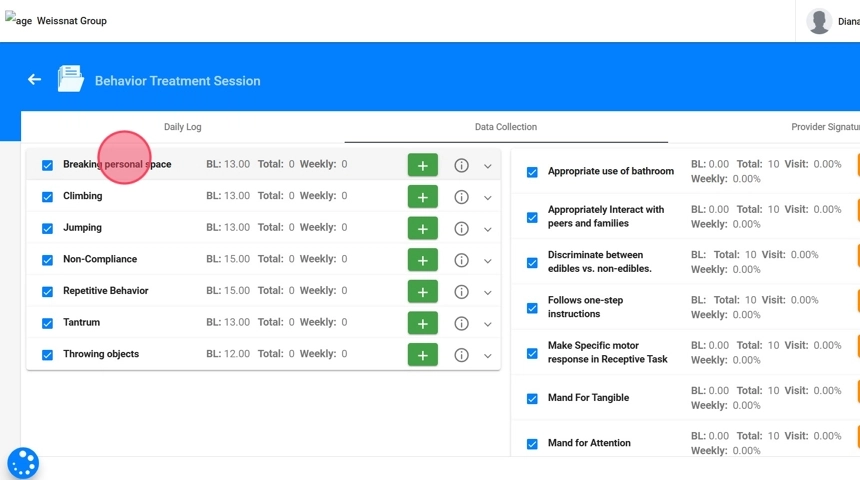
On the left side of the screen: the maladaptive behaviors.
On the right side: the replacement behaviors and skill programs, organized as follows:
- First, all replacements/skills without targets, listed in alphabetical order.
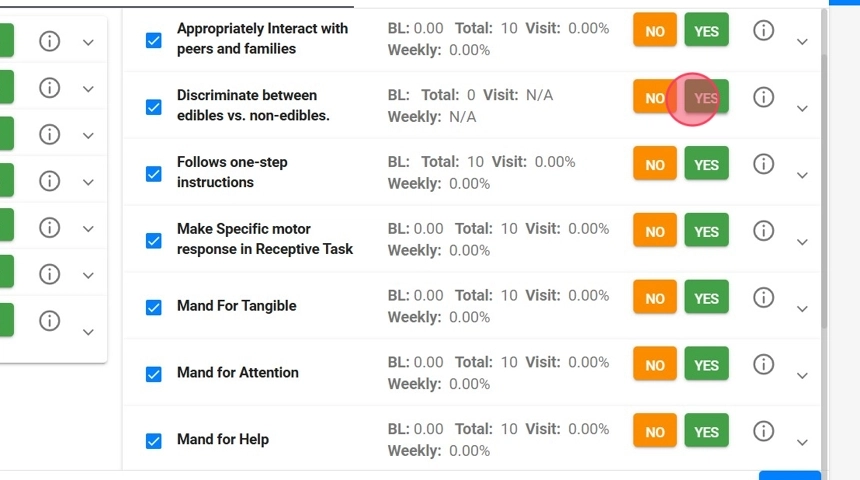
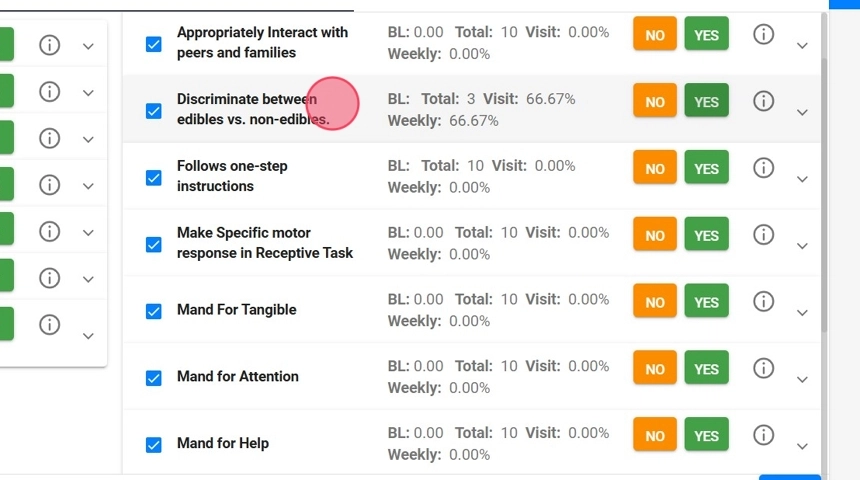
- Then, all replacements/skills with targets, also listed in alphabetical order.
Both columns operate independently, meaning you can collect data for maladaptive behaviors and replacement skills simultaneously.
2. Quick collection view
You can now collect data without opening each individual behavior or skill program. This streamlines session documentation, reduces navigation time, and helps staff stay focused on the client rather than the system.
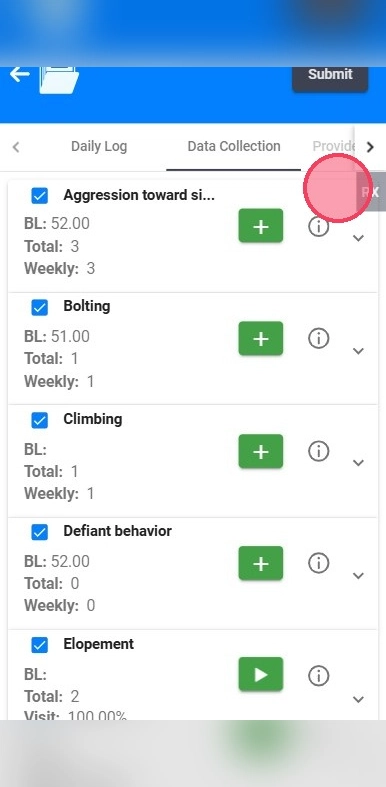
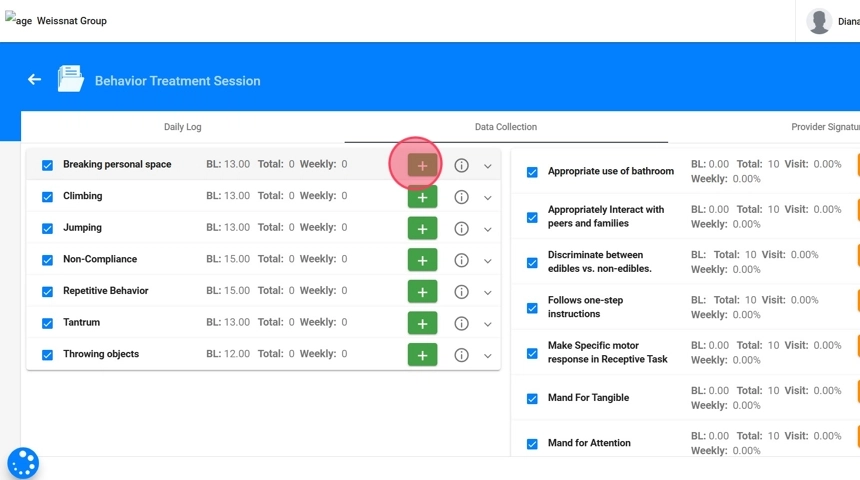
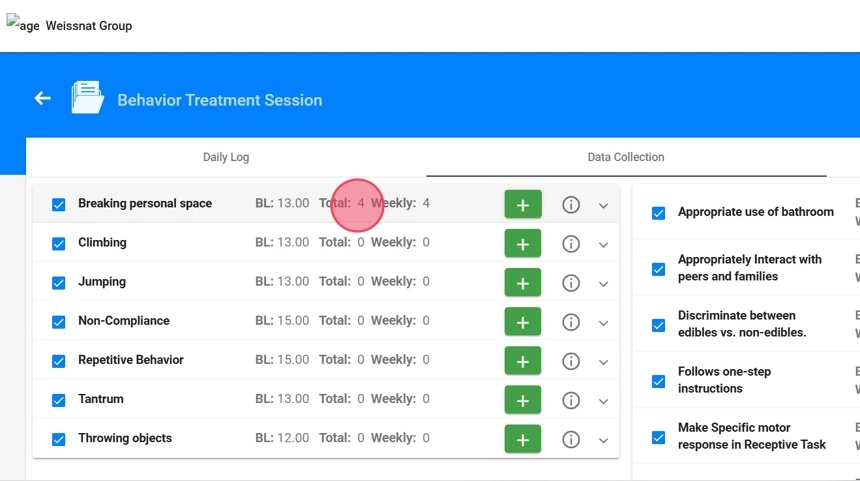
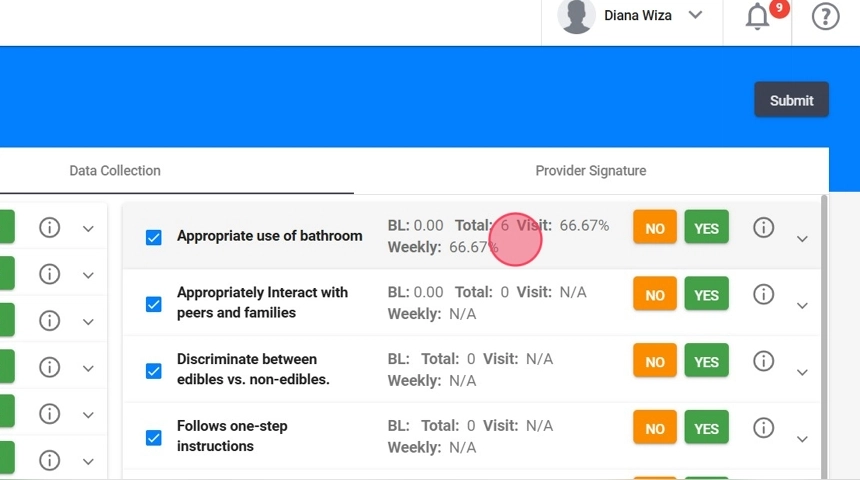
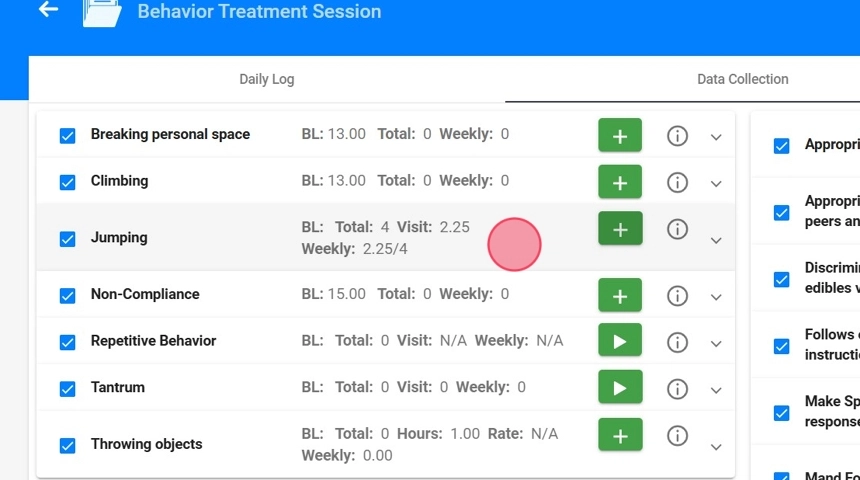
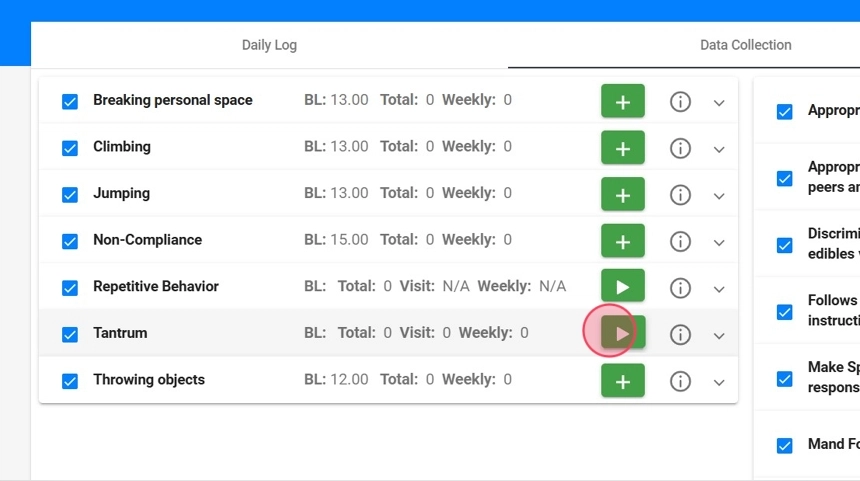
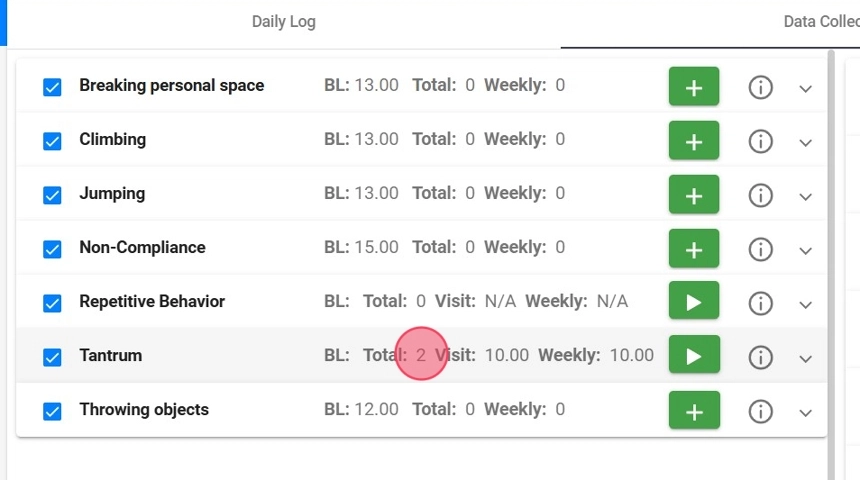
3. Each line shows:
- Checkbox – Indicates whether the skill or behavior will be collected during the session.
- Behavior/Replacement/Skill Name
- BL (Baseline) – Displays the baseline value, if applicable.
- Total Visit & Weekly Counters – These values update automatically as data is entered.
4. - A quick data-collection option that adapts to the measurement type of each skill or behavior and allows you to collect data directly without opening each item individually.
See Step 3 to learn how to use the quick collect!
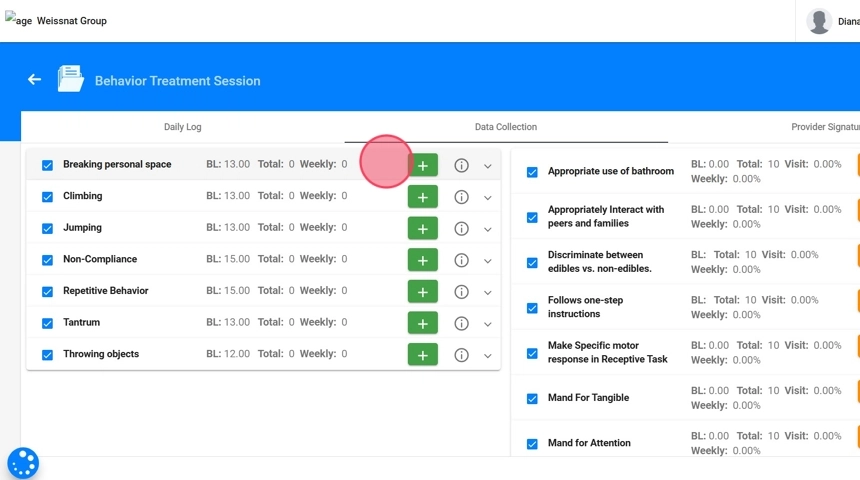
5. - Information icon – Provides additional details about the skill or behavior.
From the information icon on the right side of each behavior or replacement skill, you can view clinical details without leaving the note.
- Behaviors include: Topography, Functions and Interventions
- Replacement Skills include: Procedure, Definition, Barriers & Functions

6. - If you click on the skill or behavior, you can access the full data-collection view, including each incident or trial and the live data-collection graph (it will allow you to view graph updates in real time).
3. Collecting Data
The options available in Quick Collect will vary depending on the measurement type selected for behaviors, replacement behaviors, and skills. Different measurement types display different data entry options.
Frequency
7. To collect frequency data using Quick Collect, simply click the “+” button to record each occurrence.
8. If you need to review or modify the data collected through Quick Collect, open the behavior. There you will see the full data-collection view:
- All recorded incidents
- “+” and “–” options that allow you to adjust or correct entries as needed
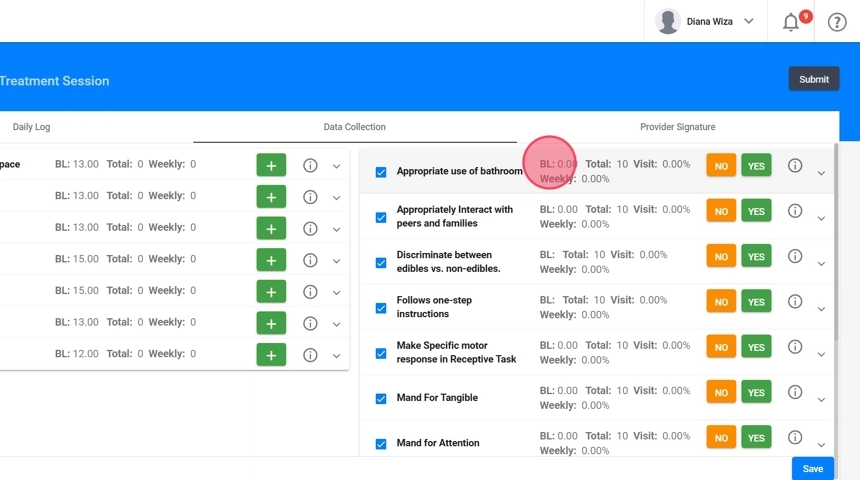
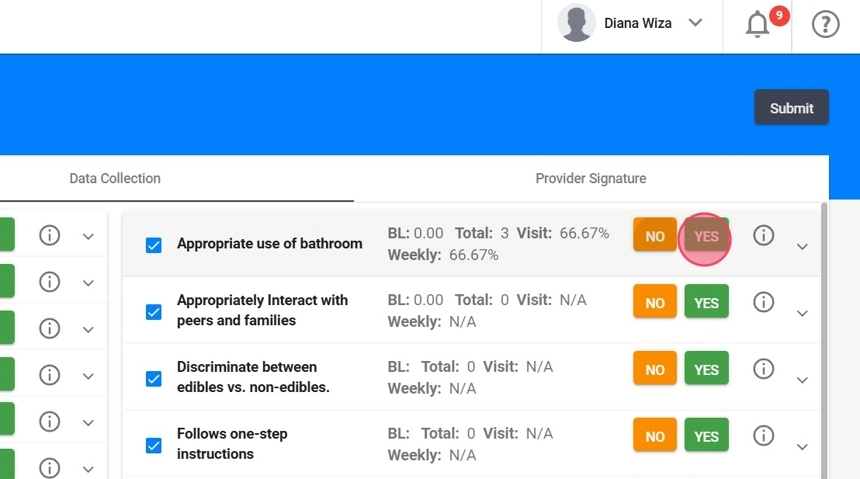
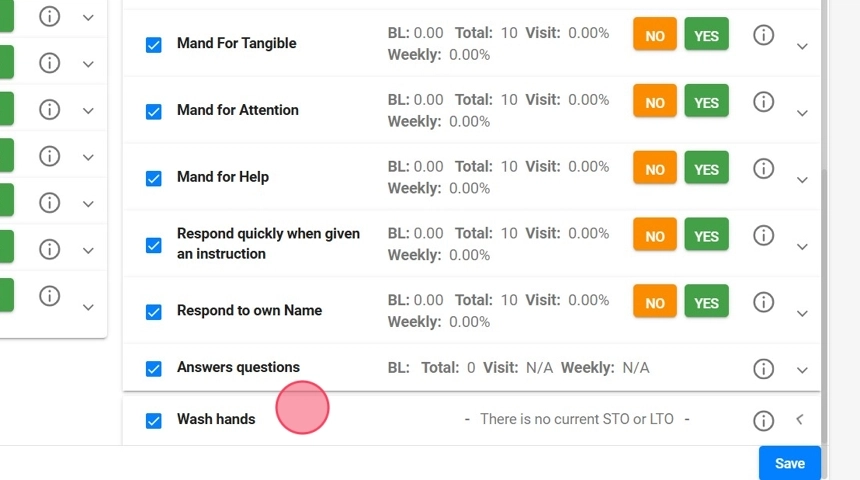
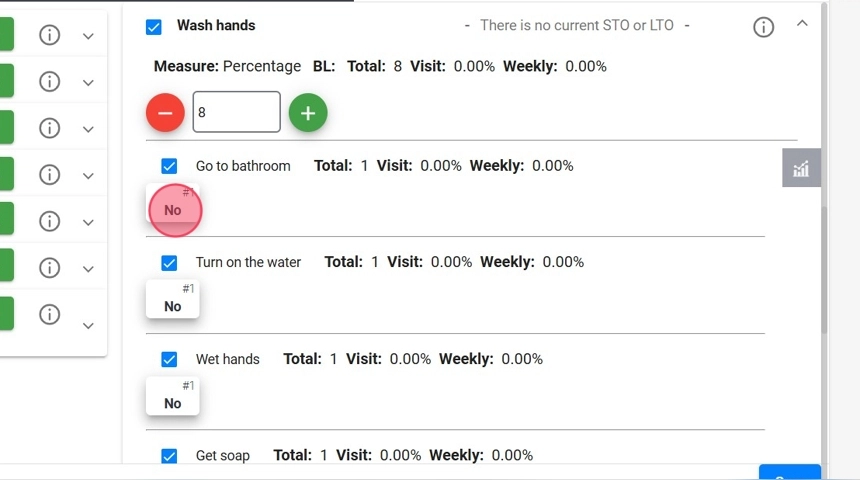
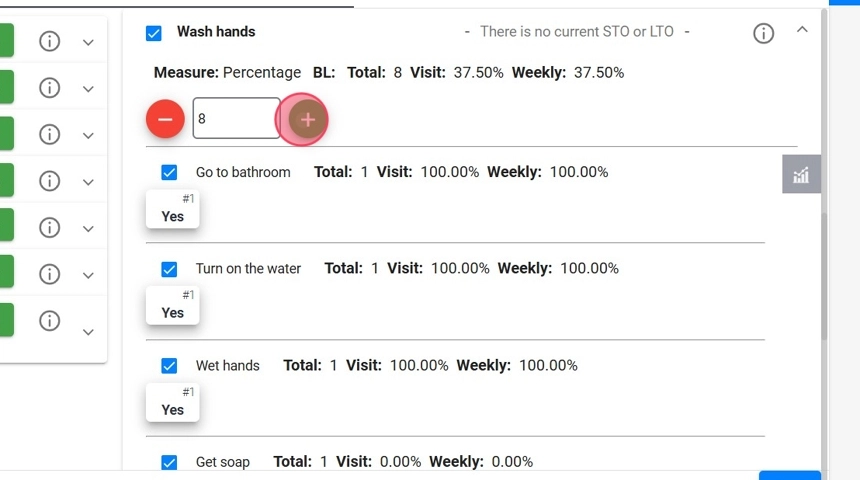
Percentage
9. To quickly collect percentage-based data, simply
- click YES each time you want to record a successful trial, and
- NO each time a trial is unsuccessful.
10. If you want to view, add, or modify trial information, click the replacement behavior or skill. This will open the full data-collection view, where you can:
- Review all recorded trials
- Adjust the effectiveness of each trial (switch between YES and NO)
- Add or remove trials as needed
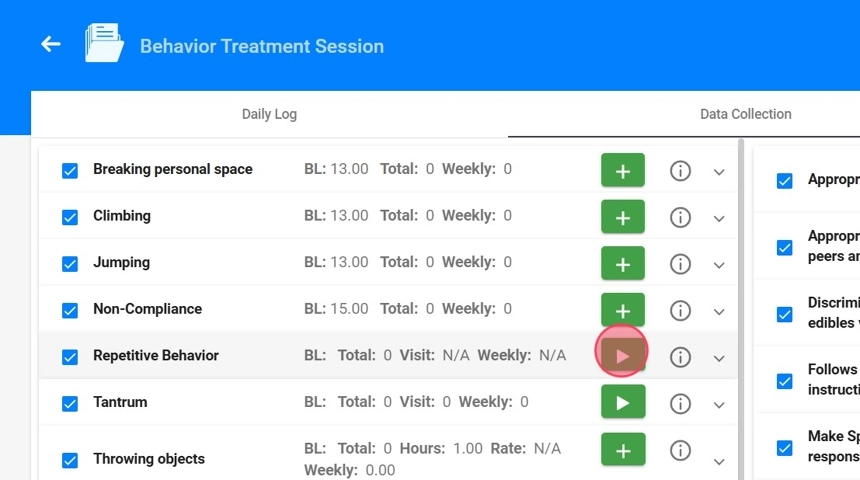
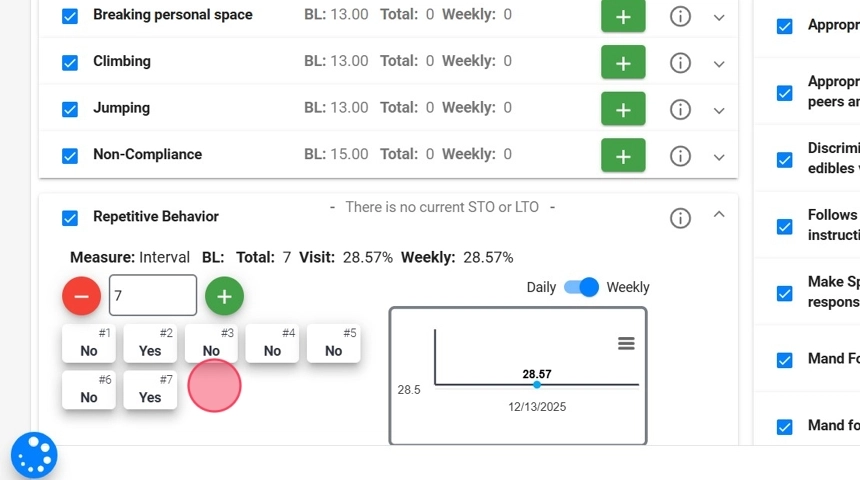
Intervals
11. Interval recording uses a timer to automatically create time segments (intervals) based on the preset duration for that behavior (for example, 5 minutes or 10 seconds).
How it works:
1) Start the timer: When you click Start, the system begins creating intervals one after another.
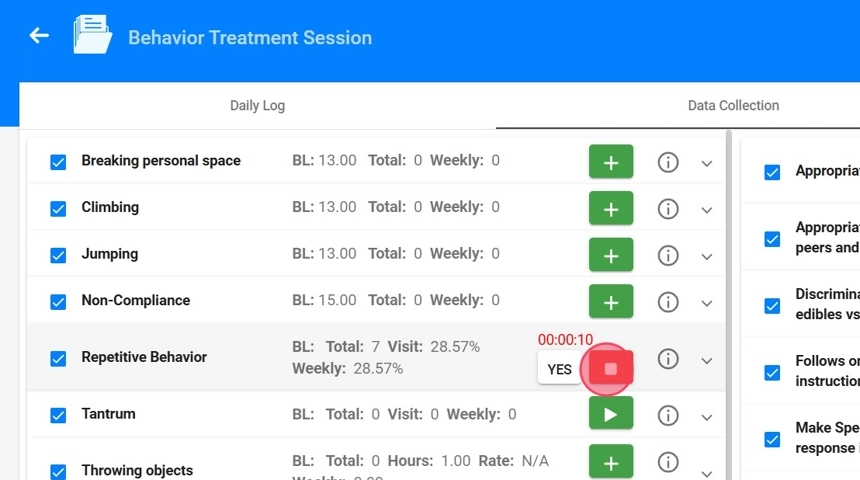
12. 2) Record whether the behavior occurred during each interval: Click YES if the behavior occurs at any point during that interval.
- If the behavior occurs more than once within the same interval, you do not need to press YES multiple times—just ensure the YES button remains active (blue).
- If the behavior does not occur during the interval, simply leave it unmarked.
When one interval ends, the result (Yes or No) is recorded in the data collection and the next one starts automatically. You just continue marking YES only if the behavior occurs during that new interval.

13. 3) Stop the timer: When you finish collecting interval data, click Stop. This ends the interval sequence, and no more intervals will be added to the data collection.
14. If you want to view, add, or modify interval information, click the behavior. This will open the full data-collection view, where you can:
- Review all recorded intervals
- Adjust the occurrence for each interval (switch between YES and NO)
- Add or remove intervals as needed
Intensity
15. To collect intensity data simply click the “+” button each time the behavior occurs. After clicking “+”, you will be prompted to select the intensity level for that incident.

16. If you need to review or edit intensity entries, open the behavior to access the full data-collection view. There you can:
- See all recorded incidents
- Adjust the selected intensity level for any incident
- Add or remove incidents as needed
Duration
17. To collect duration data ( Time-seconds- / Time -minutes- / Time sum -min-), use the built-in timer.
- Click Start when the behavior begins, and the timer will begin running.
- When the behavior ends, click Stop, and the system will automatically record the duration.
Each time the behavior occurs, repeat the Start/Stop process.
18. If you want to view, add, or modify the number of incidents or their durations, click the behavior. This will open the full data-collection view, where you can:
- Review all recorded incidents
- Adjust the duration of any incident
- Add or remove incidents as needed
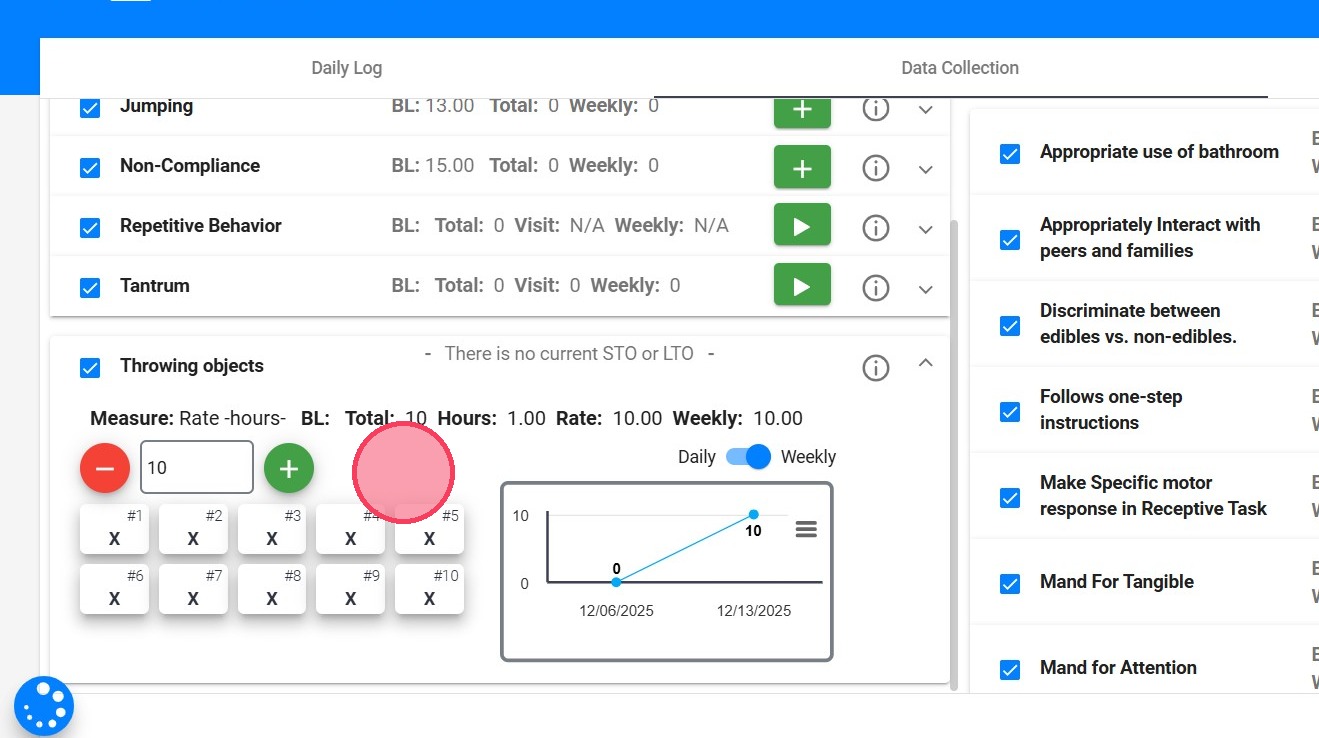
Rate -hours-
19. To collect data in rate according to the hours of visit duration, you only need to collect the number of occurrences during the session. In this case, the rate will be calculated based on the number of incidences over the duration of the session.
20. If you need to review or modify the data, open the behavior. This will display the full data-collection view, where you can:
- See all recorded incidents
- Use the “+” and “–” options to adjust or correct entries as needed
Task Analysis
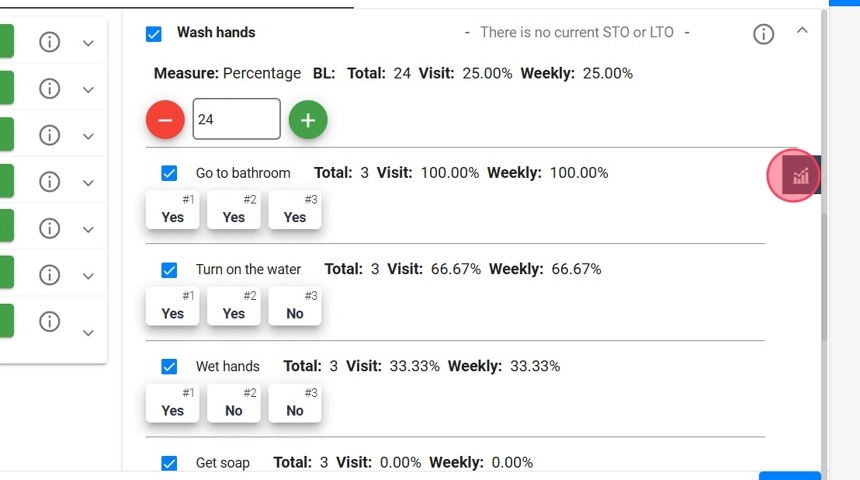
21. You can record how the client performs each step of a multi-step skill. Quick Collect makes this process efficient by letting you add trials instantly and then score each step within those trials.
22. Adding trials
- Click the “+” button to add a new trial.
- Each trial automatically includes all the steps in the task analysis (e.g., go to the sink, turn on the water, wet hands, get soap, etc.).
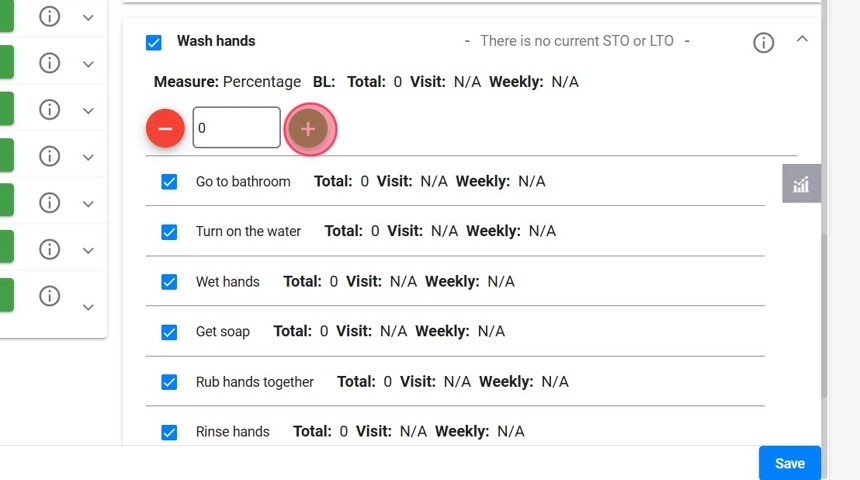
23. Scoring each step
To score the performance for each step within a trial, mark whether the step was completed correctly or not (Yes or No)
You will see all steps listed in every trial, allowing you to record performance step-by-step.
24. - You can edit each step’s performance
- Add or remove trials as needed
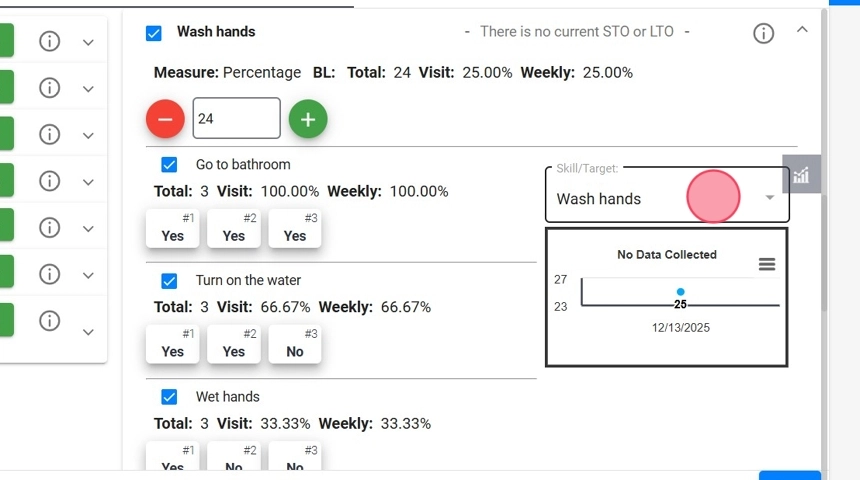
25. To view the live data-collection graph, click the graph icon.
26. From there, you can:
- See the overall graph for the entire Task Analysis program, or
- Select a specific step to view its individual performance graph.
This allows you to quickly monitor progress at both the program level and the step level.
If a specific behavior, replacement, or skill is not selected for data collection, the system will not record it as 0; instead, it will be omitted from data collection.
If you choose to mark a behavior, replacement, or skill for data collection but do not input any data for it, the system will automatically record a value of 0 for that session.
27. It's important to save the changes before exiting the note.
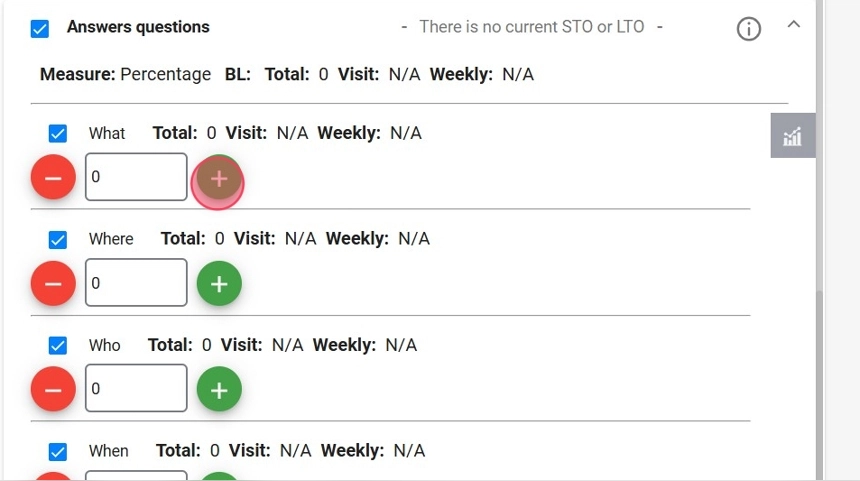
Targets
28. When you open a program that contains targets, each target appears as an individual item, allowing you to record data independently for each one.

29. When you expand a program with targets, you will see each individual target listed. Each target includes its own Yes/No options
- Click Yes for a successful trial.
- Click No for an unsuccessful trial.
Each trial updates the program’s totals automatically.
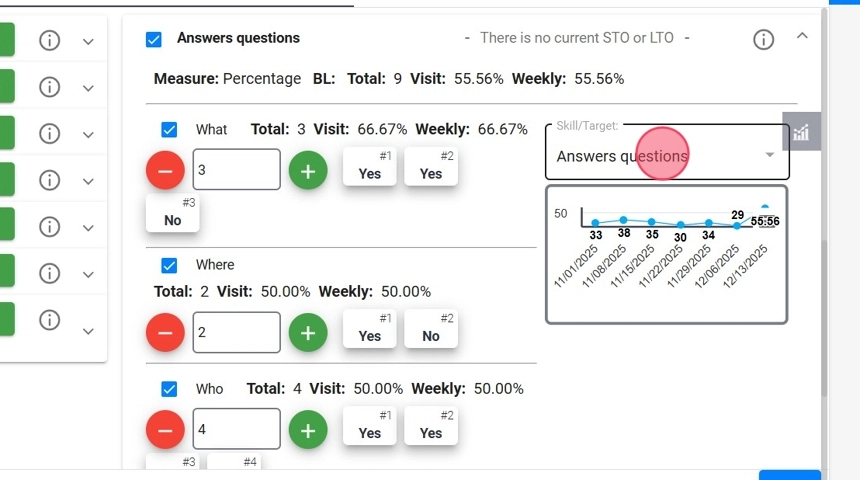
30. To view the live data-collection graph, click the graph icon.
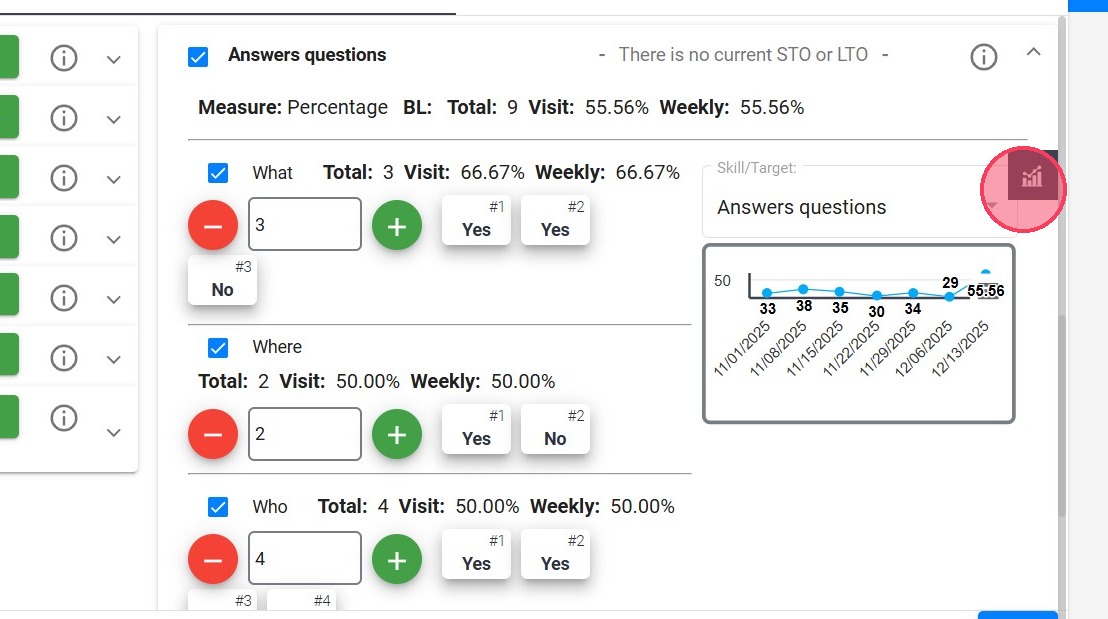
31. From there, you can:
- View the overall graph for the entire program, or
- Select a specific target to view its individual performance graph.
Prompts
32. For programs that use prompt-level data collection, the process is similar to percentage-based targets:
- Click YES to record a successful trial.
- Click NO to record an unsuccessful trial.
After selecting YES or NO, the system will ask you to choose the prompt level used for that trial (for example: independent, gestural, partial physical, full physical—based on the prompt options linked to the program or the current STO).
If you use the same prompt for all trials, click Apply to All Trials. The prompt level will be automatically added to each new trial, making data collection smoother and faster.
33. If you need to review or edit prompt levels, just click the program to open the full data-collection view.
- There, you can update the prompt level for any recorded trial or adjust the trials as needed.
4. Mobil view
34. When you open data collection on your phone or tablet, you’ll be able to toggle between the Behavior and Replacement views.