How to add maladaptive behaviors and programs to client profiles (for analysts)
This guide provides essential instructions for adding and managing Maladaptive Behaviors, Replacement Behaviors, and Skill Acquisition Programs within a client’s profile. It offers a step-by-step approach to not only create new entries but also import existing programs, customize them, and effectively monitor progress STOs. By understanding the various features, including behavior statuses and measurement, users can enhance their ability to meet individual client needs. Viewing this guide will empower practitioners to optimize their workflow and improve client outcomes efficiently.
Section 1: Accessing Client Profile and Skills & Behaviors Tab
1. Log In:
- Use your account with appropriate permissions (Analyst or Administrator).
- Ensure you have access to the client for whom you’ll add the program or behavior.
2. Navigate to the Client's Profile:
- Go to the Clients section.
- Select the client from the list.
- You can navigate to the search bar at the top right of your screen to look up the desired client. You may search using the client's name, Medicaid number, EQ Health number, caregiver's name, or phone number.

3. Access the Skills & Behaviors tab:
- A screen displaying all the documentation and client information will appear. Navigate to the menu bar at the top of the screen and choose the "Skills & Behaviors" tab.

4. Select the Appropriate Tab:
Once you're in the Skills and Behaviors section, choose the tab based on what you're adding:
- Maladaptive Behavior
- Replacement Behavior
- Skill Acquisition Program
This selection ensures the correct category for your entry, whether you're working on a behavior modification plan or a new skill development program.

Users have the option to either manually create a new behavior or program or import existing items from pre-designed or custom libraries. Both methods allow flexibility.
Section 2. Adding a Behavior or Program by importing from Libraries
5. Users can import existing items from the pre-elaborated or custom libraries.
- Just click the red "+" and select Import from Library. This will open the library browser

This process is broken into key steps:
- Search
- Import
This will allow users to easily browse through libraries, select relevant behaviors or programs, and import them into a client’s profile for further customization.
Step 1: Search
6. The Search step allows users to explore all the available libraries to find the behaviors and programs they want to import. During this step, users can:
- Browse the Libraries: Users have access to all available libraries, including system libraries, shared agency libraries, and their own created libraries.

7. Preview Behaviors and Programs:
- Users can easily view a list of all behaviors or programs, including the folders where they are stored and the number of times they've been imported.

8. - Clicking the arrow next to an item provides a quick preview of key details such as its name, description, measurement type, and other relevant information, making it convenient to review and organize content efficiently.

9. Select Behaviors or Programs to Import:
Once users have identified the behaviors or programs they want, they can select one or multiple items, and move forward to the import stage by clicking "Next"

Step 2: Import
10. After selecting the behaviors or programs, the next step is the Import process, where users can review and customize the content they’ve chosen.

11. Edit and Customize:
Users can fully edit the selected behaviors or skills to tailor them to the specific case.
- For behaviors, users can adjust fields like Name, Status, Measure (e.g., Frequency, Percentage, Time), Topography, and Barriers.
- For skills or programs, they can modify the Definition, Procedures, Teaching Materials, and more.
The rich text editor is available to enhance the presentation of definitions, goals, or descriptions.

12. The available statuses within the system include:
- In Observation: This status is assigned to behaviors or programs when they are newly observed. This status is available only at the beginning of the behavior observation.
- Data collection is allowed.
- Pending: Typically used for behaviors or programs that are not currently being addressed or are awaiting further action.
- Data collection not required.
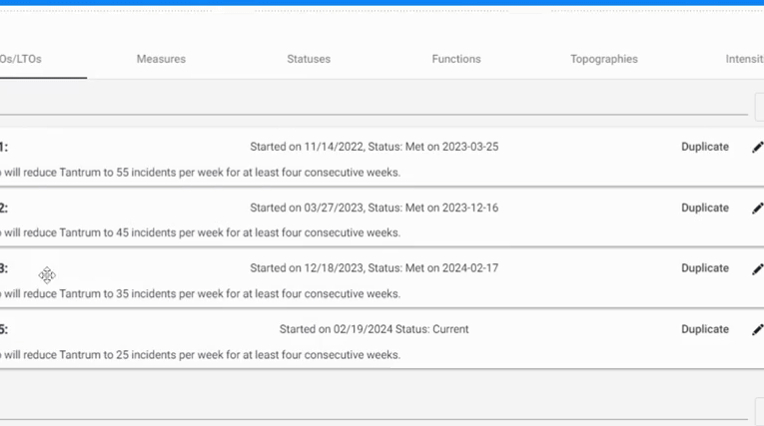
- Ongoing: These are behaviors or programs that are actively being targeted and monitored for progress.
- Require regular data collection
- Mastered: Behaviors or programs in the "Mastered" status indicate that has been successfully addressed.
- No longer requires data collection. They are not displayed in the session notes.
- Discontinued: Behaviors or programs labeled as "Discontinued" are no longer being targeted or addressed.
- They do not require data collection and are not displayed in the session notes.

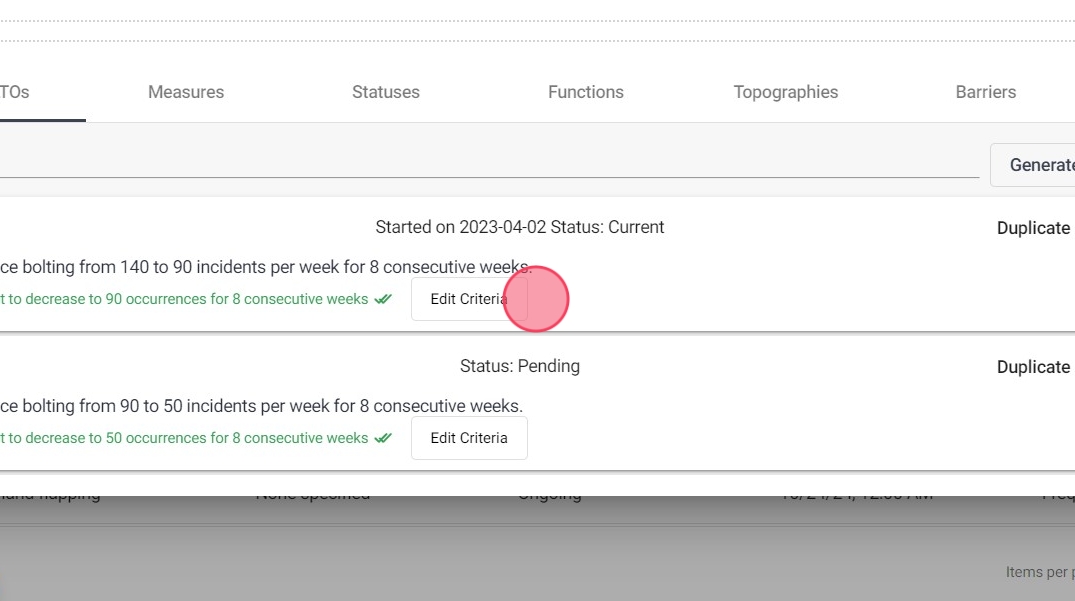
Understanding these behavior statuses and their associated data collection procedures is essential for effectively managing and tracking behavior progress in our system.
13. Measurements available for Maladaptive Behaviors:
- Frequency: Tracks how many times a behavior occurs during a session, providing a count of its repetition.
- Percentage: Calculates the proportion of a specific behavior compared to total opportunities or responses as (specific responses ÷ total responses) × 100.
- Intervals: Divides the observation into equal intervals, noting if the behavior occurs, and calculates the percentage of intervals with behavior occurrences.
- Intensity -average-: Measures the strength or force of the behavior, focusing on its magnitude rather than its frequency.
- Time -seconds-: Records the duration of the behavior in seconds, suitable for short-duration behaviors. Example: (10s + 12s + 8s) ÷ 3 = 10 seconds (average).
- Time -minutes-: Tracks the duration of behaviors in minutes and calculates the average. Example: (5 min + 7 min + 6 min) ÷ 3 = 6 minutes.
- Time (sum) -min-: Measures the total duration of a behavior across all instances in a session. Example: 10 min + 15 min + 20 min = 45 minutes.
- Rate -hours-: Determines the frequency of behavior occurrences per hour, offering insights into behavior trends over time.

14. Measurements available for Replacements and Skills:
- Frequency: Tracks the number of times a program occurs during a session. Each occurrence is counted, providing a straightforward measure of program repetition.
- Percentage: Calculates the proportion of a specific program relative to total opportunities or responses. It is determined by dividing the specific responses by the total opportunities and multiplying by 100.
- Time (Seconds): Measures the duration of a program in seconds. For example, if a program occurs with durations of 10s, 12s, and 8s, the average is (10 + 12 + 8) / 3 = 10 seconds.
- Time (Minutes): Records the duration in minutes and calculates the average. For instance, durations of 5, 7, and 6 minutes result in an average of (5 + 7 + 6) / 3 = 6 minutes.
- Total Time (Minutes): Captures the cumulative duration of a program in minutes across a session. For example, durations of 10, 15, and 20 minutes sum up to 45 minutes.
- Task Analysis: Breaks down complex tasks into smaller steps to measure individual progress. This allows for detailed tracking of skill acquisition or mastery over time by measuring the completion of each step.
- You can add the task list once the program is added to the client's profile.

15. You can remove previously selected items if you don't want to import them

Step 3: Adding STOs
16. STO Auto-Generation:
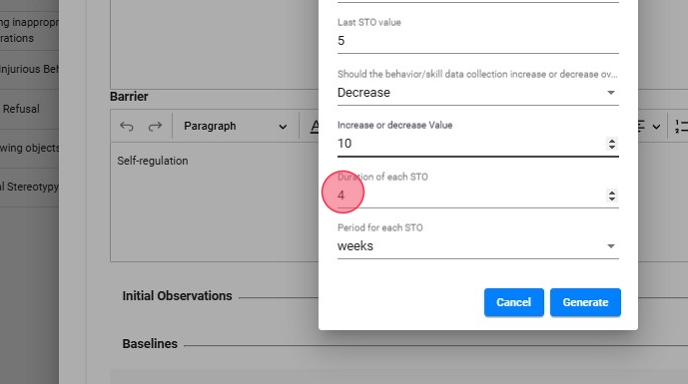
Users can utilize the STO auto-generation tool to automatically create STOs. This tool helps generate measurable targets that are critical for monitoring progress.

17. - Click Generate to use this feature

You can tailor the STOs to the specific needs of your client by adjusting various parameters:
- Start and End Values
- Increase or Decrease
- Value Change
- Duration
- Period
18. - Start and End Values: Set the initial and target values for the STO (e.g., start at 2 and aim for 10)

19. - Increase or Decrease: Indicate whether the STO is meant to increase or decrease a behavior or program.

20. - Value Change: Define the increment or decrement value (e.g., increase by 10).

21. - Duration: Specify how long the client has to achieve the objective.

22. - Period: Set the period in days, weeks, or months to give a clear timeline for STO completion.

23. - Once you are done, click "Generate"

24. - After the system generates the STOs, you can manually edit the details to ensure that the objectives perfectly align with the client’s needs and goals.

25. You also have the possibility to specify the status in which the STO is and the effective date. The available statuses are:
- Pending: Marks the STOs that are waiting for implementation.
- Current: Indicates the active STO.
- Mastered: Designates objectives that have been successfully achieved.
- Discontinued: Indicates STOs that are no longer applicable or relevant.

These statuses offer better visibility into the progress of treatment plans and help you better monitor client outcomes over time.
Step 4: Final Review and Submission
26. After customizing each behavior or program, users can click Submit to finalize the import. Once submitted, the behavior or program is added to the client’s profile.

Section 3: Creating a Behavior or Program from Scratch
Users have the option to create Maladaptive Behaviors, Replacement Behaviors, or Skills Acquisition programs from scratch.
Step 1: Create a New Entry from Scratch
27. - Click the red "+" icon
- Select "Create from Scratch"
This allows you to start a new entry without importing from a library.

Step 2: Customize the Behavior or Program
28. - Adjust key fields like Name, Status, Measure (e.g., Frequency, Percentage, Time), Topography, and Barriers for behaviors.
- For skills or programs, modify sections like Definition, Procedures, and Teaching Materials.
Use the rich text editor to enhance definitions, goals, or descriptions.

Step 3: Add STOs and LTOs
29. Even when creating from scratch, you can use the automatic STO generation tool discussed in the second section of this guide.

30. You can also create the STOs manually:
- Click the "Add" button to create a new STO or LTO manually.
- Enter details such as Start Date, Expected Met Date, Status, Effective Date, and Description.

For better efficiency, create the first STO and LTO and save them. Once the behavior or program is in the client's profile, you will be able to duplicate that first STO as many times as you want, and change the description of each duplicated STO.
Step 4: Save the Behavior or Program
31. After completing the information, click the "Save" button to finalize and store your new behavior or program.

Section 4. View Behaviors or Programs
32. You can view behaviors or programs either in a list format or organized by folders. This allows you to view and access the information in a way that suits your needs best.

Step 1: Switch Between List View or Folder View
33. To switch between these views, simply choose the desired option, depending on your preference.
- From the “Skills & Behaviors” section, look for the button at the right and click on it to toggle between the list view (table view) and the folder view (structure view)

34. You can view the skills and behaviors in the familiar list view, which provides a straightforward way to access all your data.
Remember that only 7 behaviors or programs appear on a page, if you include more than 7 they will be stored on another page which you can access by pressing the button at the bottom right of your screen as shown in the image.

Step 2: Creating folders
35. In the folder management area, locate and click the “Add” button (+)

36. You will be able to create folders or behaviors/programs directly.
- Click "Add Folder" to create a new folder

37. - Enter a descriptive name for your domain that accurately reflects the category of skills or behaviors it will contain (e.g., "Social Skills," "Coping Strategies").
- Save: click the “CREATE” button to create the domain.

38. - The new domain will now appear in your list of folders.

39. Click the arrow to expand each folder and see its content

Step 3: Organizing Skills and Behaviors
You can either create new skills or behaviors directly within the appropriate folder, or you can organize existing ones by sorting them into the correct folders.
40. Selecting a Skill or Behavior
- Click on the skill or behavior you want to organize

41. - In the detail page click the option "Move Folder".

42. - Assign to a folder
- Click the Choose path option, and a dropdown menu will appear with your existing domains and subdomains.
- Select the appropriate domain or subdomain for the skill or behavior.
- Save Changes
- Once assigned, ensure to save the changes.

43. The skill or behavior will now be categorized under the selected folder.

Step 4: Viewing and Managing Folders
44. Edit or Delete Folders
- If you need to edit a folder, select the folder and click on the “Edit” button. Make the necessary changes and click “Save.”
- To delete a folder, click the “Delete” button and confirm the action.

Section 5. Edit the Behavior or Program
45. Once the behavior or program is created, you can edit and change its information. You just have to click on the behavior or program you want to modify, and you can do it from the tabs inside the popup window

Step 1: Edit the STO/LTO
In the STO/LTO tab, you will have various editing options such as duplicate, edit, and delete.
46. - Duplicate
You can duplicate the content of the STO if required.

Duplicating the initial STO you crafted and modifying the content of the duplicates can streamline the process of creating the STOs manually.
47. - Delete
You can delete it.

48. - Manually adjust the order of the STOs:
You can also adjust the order of the STOs after they have been created. Click on the STO you want to move, then drag it to the position you want within the list. Release the mouse button to place the STO in its new position.

49. - Edit name and description
Users have the ability to change the names and descriptions of the STOs to fit their individual requirements. To do this, simply click on the pencil icon next to the STO you wish to edit.

50. Click on the "Name" field to change the name of the STO and click on the "Description" field to change its description.

51. When you finish editing it click "SAVE".

Step 2. Understanding and Adjusting STO Criteria
The STO Criteria is essential for determining when an STO is considered met or not met
52. When an STO is saved, the system automatically generates a criteria based on the STO description.
Criteria breakdown:
- Value: The system checks if the behavior or skill has reached the desired end value (increase or decrease) based on the STO.
- Duration and Period: Ensures that the target is met within the specified time frame (e.g., 2 months, 3 weeks, etc)

53. Manual Adjustments:
You can manually adjust the STO criteria if needed, just click "Edit Criteria"

54. Manually adjust the STO met criteria.

55. Click "Update" to save the configuration

- STO Monitoring and System Analysis
Each time a visit is submitted, the system checks if the STO meets the "met" conditions, based on the defined criteria (value, duration and period).
56. Automatic Progress Tracking:
If your agency has enabled the setting to automatically mark STOs as met, the system will mark the STO as "met" with the determined date and proceed to the next STO.
57. Manual Review Option:
If the automatic setting is disabled, the system will still analyze the STO but won’t automatically mark it as met. Instead, you can review this analysis using the STO Analytics tool. The system will provide a suggestion, indicating whether the STO should be marked as met (including the recommended met date) or if it is still not met, allowing for a manual decision.

