How to add Scheduling Restrictions to block specific dates for Clients
This guide provides a straightforward method for adding client restrictions within an appointment management system, ensuring that therapists do not inadvertently schedule appointments during a client's unavailable times. By following the step-by-step instructions, users can easily navigate the system to implement these crucial restrictions, enhancing scheduling efficiency and client satisfaction. Understanding how to manage these restrictions can help maintain professional boundaries and organization in therapy sessions. Overall, this guide is essential for anyone looking to optimize their appointment management practices.
A restriction for a client is a rule within the appointment management system that prevents therapists from scheduling sessions on specific dates or times for the client to whom the restriction was applied. This feature ensures that appointments are not booked during unavailable periods, such as days off or hours reserved for other commitments.
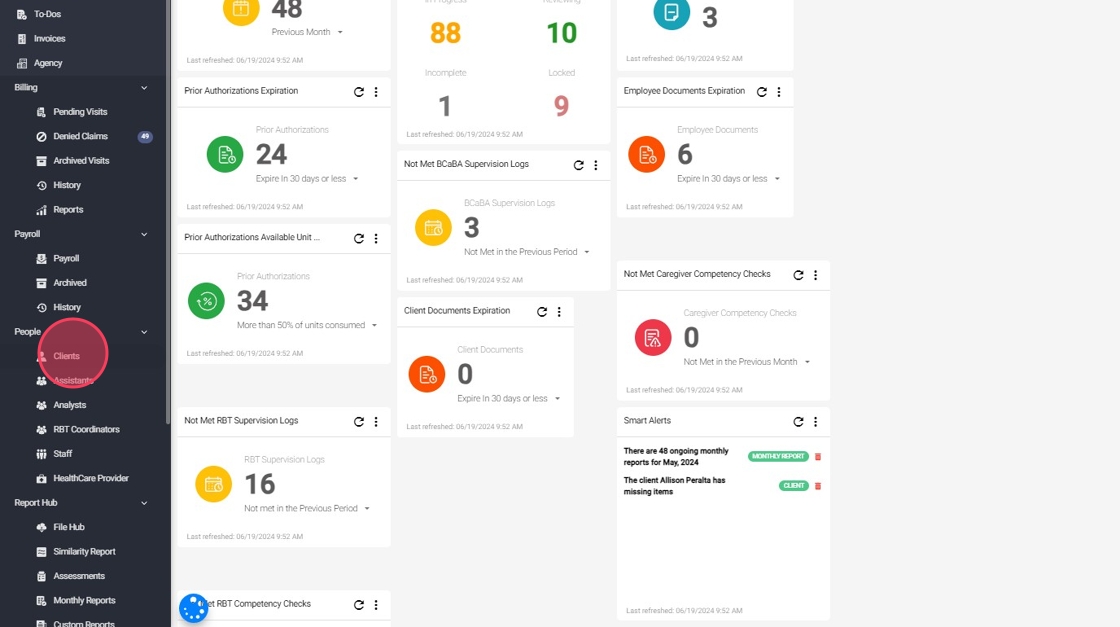
1. Log in to the program with your username and password as usual. Once inside the program, go to the "Clients" section in the side menu on the left side of your screen. Please see the following image.

2. In the search bar located at the top right of your screen, search for the desired client. The search can be done using the first and last name, "Medicaid Number," "Health EQ Number," the guardian's name, or the client's phone number, as shown in the image.
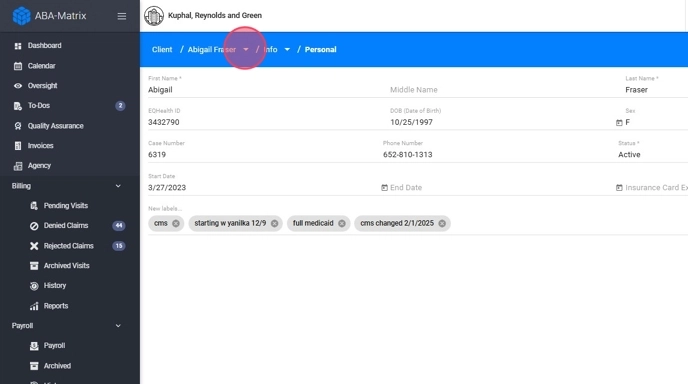
Once you have located the client you want to work with, click on their name.

3. A screen with all the client's personal information will open. Go to the menu bar at the top of the screen, where you will find several sections containing all the documentation related to the client within the program. Locate the Scheduling Restrictions tab and click on the Blocked Dates tab. See the image below.

4. Once inside the section, press the "+" button located at the top right of your screen to add a new restriction. Please see the image below.

5. To complete the process of adding a new restriction, you need to fill out the required information, as shown in the following image.
- The "Start Date" and "End Date" fields correspond to the timeframe during which the analyst, assistant, and client will maintain the restriction.
- You can specify the start time of the restriction in the start date field and the end time of the restriction in the end date field.
- In the "Description" field, you can justify the reason for the applied restriction.
After entering all the required data, press the "Save" button located at the bottom of the form

The date marked as "End Date" corresponds to the date when the restriction will no longer apply, meaning that on that day, the therapist will be able to schedule a session with the client. You must set the "End Date" to the day after the restricted date.
