How to create and edit events in the system
This guide provides step-by-step instructions on how to create and edit various events in the system. It covers creating new events, selecting the event type, choosing the client, date, time, location, and procedure, as well as the option to repeat the event. It also explains how to edit events. The guide emphasizes the importance of capturing the caregiver's signature when modifying the event's date or time.
Creating events in the system
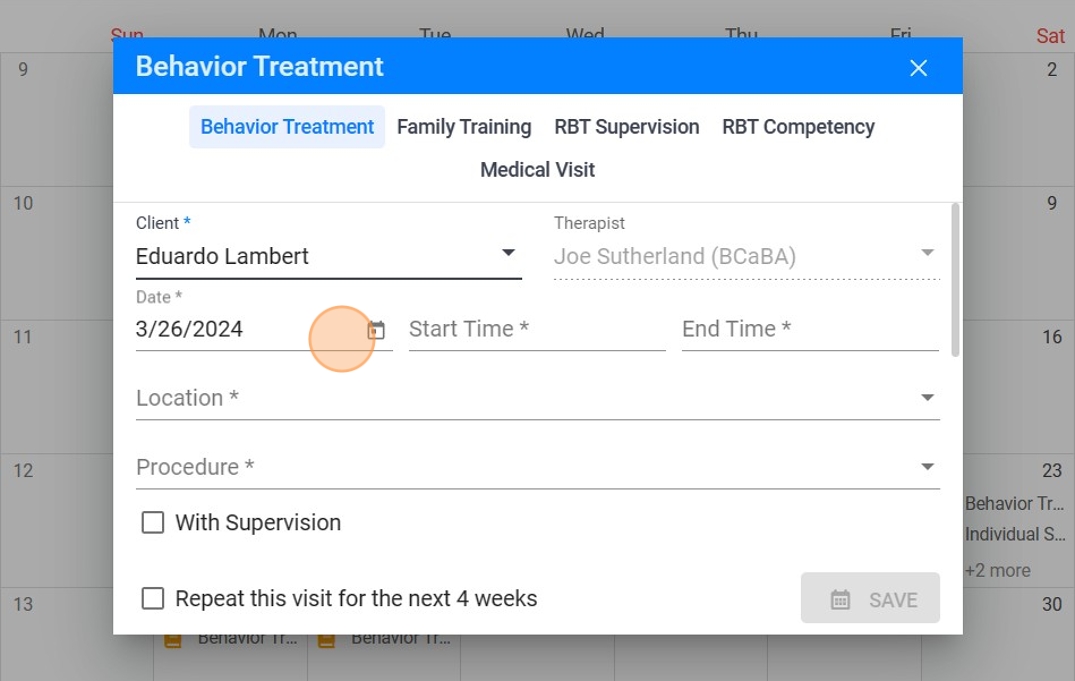
1. To create a new event, log in to the program using your username and password, and within the program, the current month's calendar displaying all scheduled sessions will be visible. To add a new event, click on the "+" symbol situated in the upper right corner of the screen.

2. Choose the type of event you wish to schedule:
- Behavior Treatment
- Individual Supervision
- Group Supervision
- RBT Competency
- Family Training
- Medical Visit
- Assessment Session
- Reassessment Session

Please be aware that fields marked with an asterisk (*) are mandatory.
3. Choose the client you wish to schedule the session with.

Once a client is selected, the system will automatically fill in the therapist's name based on the account being used to create the event.
4. Select the session's date.

5. Select the start time for the session.

6. Select the desired end time for the session.

7. Select the location for the session.

8. Select the procedure.

Once you select the procedure, the available units for the chosen client will be displayed.
9. Within this interface, you have the option to set the event to repeat weekly for four consecutive weeks, thereby establishing a more efficient monthly schedule, although this feature is optional.

10. Click on "SAVE"

Editing events in the system
11. To alter the details of an event in the system, select the session you want to edit from the calendar.

12. In this window, you can view the general information about the session; just click on "Edit Visit".

13. Selecting "Edit Visit" allows you to change the event details, such as the date, time, and location.

Within this window, you have the ability to access session notes by selecting "GO TO REPORT," or you may choose to delete the event by clicking on "DELETE."
14. After making the changes, click on "SAVE".

It's important to be aware that if the caregiver's signature has been obtained for a visit that you wish to reschedule, you will need to recollect the caregiver's signature upon altering the event's date or time.
15. Confirm to save the changes made.

