
How to run a billing (for administrative staff)
This guide provides a comprehensive overview of how to efficiently manage and run billing for pending visits within your agency. It outlines the step-by-step process from selecting visits to submitting claims, ensuring accuracy and compliance throughout. With features like automated claim generation, real-time status tracking, and detailed reporting, this guide equips users with the tools necessary to streamline their billing workflow and enhance financial oversight. It's an essential resource for anyone looking to improve their billing efficiency and accuracy.
SECTION PENDING VISITS: Managing and Billing Pending Visits
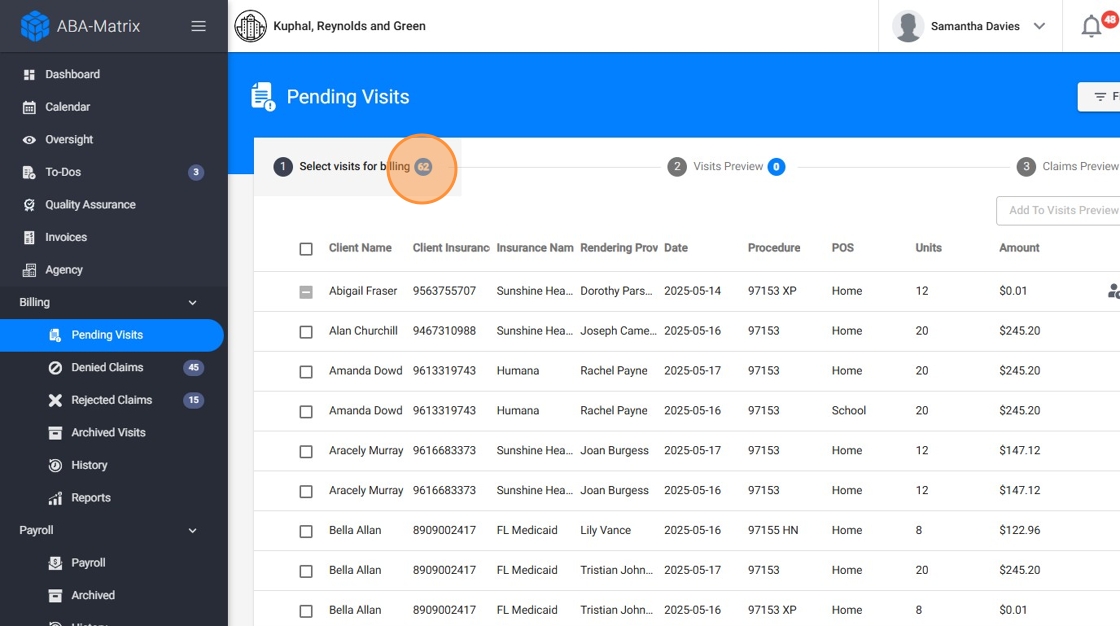
1. To run a billing, go to the Billing section and click "Pending Visits". The billing process consists of 3 steps:
- Select visits for billing: Choose the visits you want to include in the billing batch.
- Visits preview: Review the selected visits.
- Claims preview: Review the generated claims before submitting them.
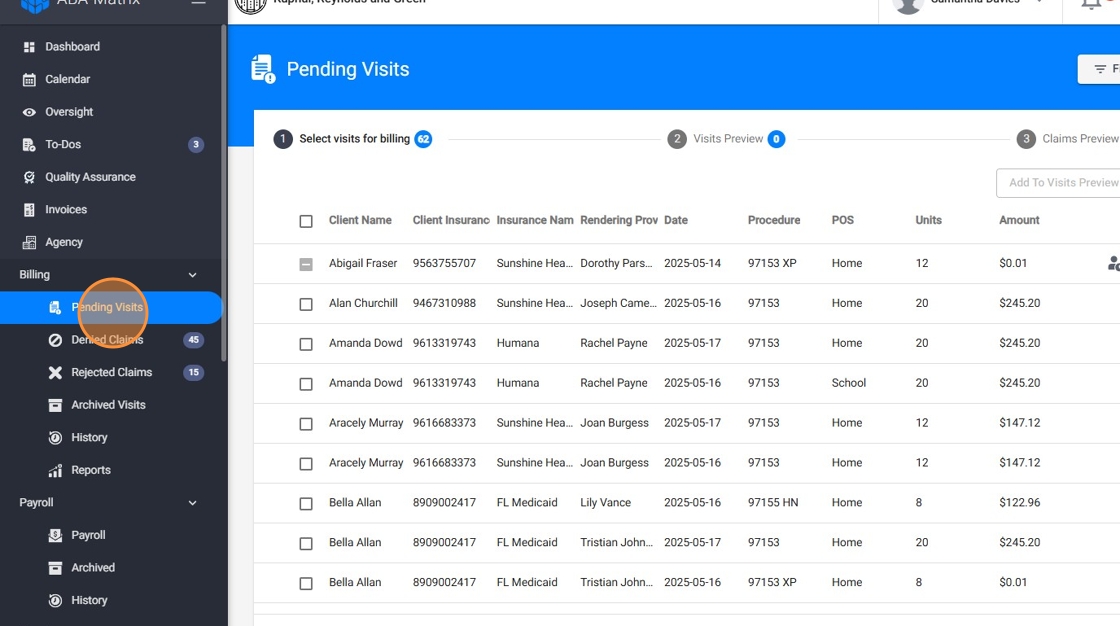
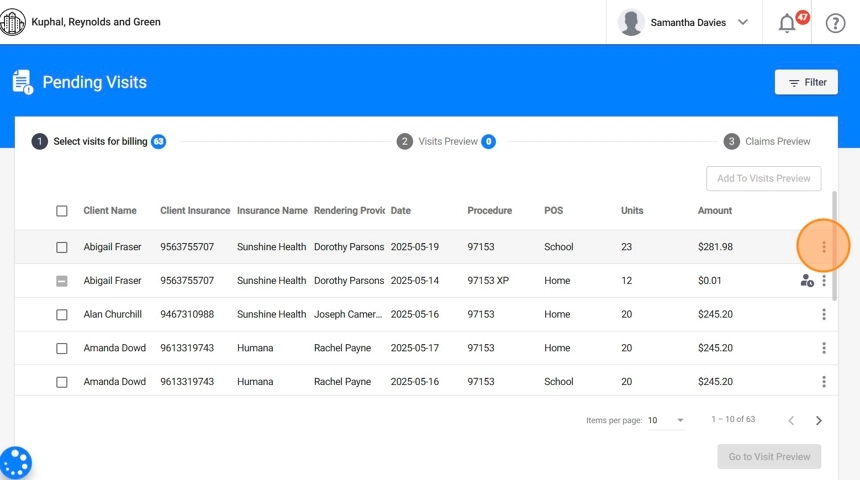
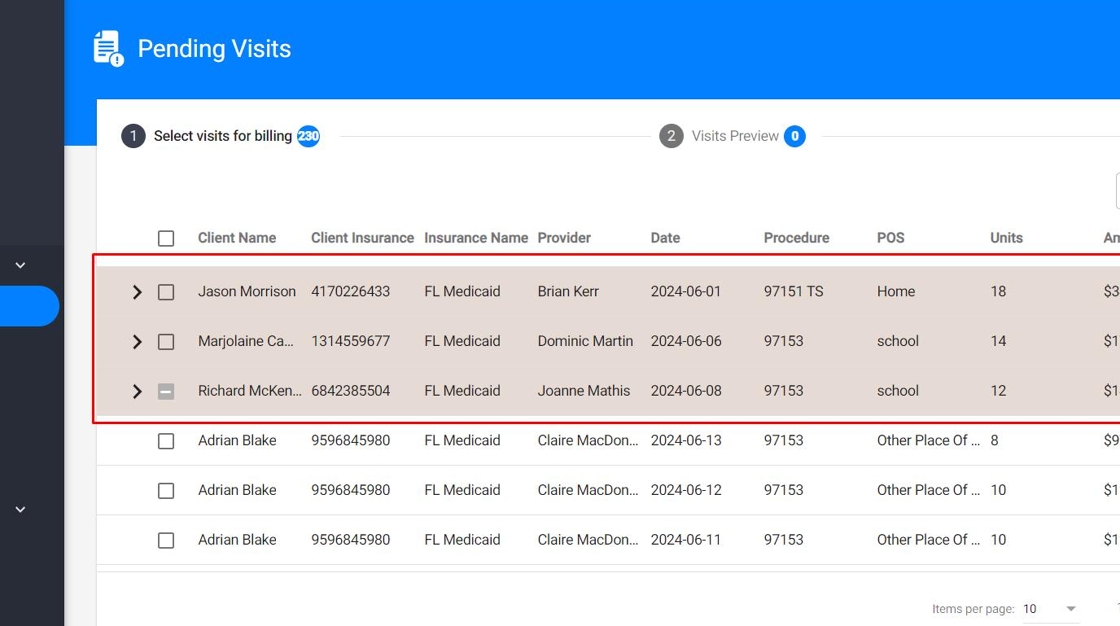
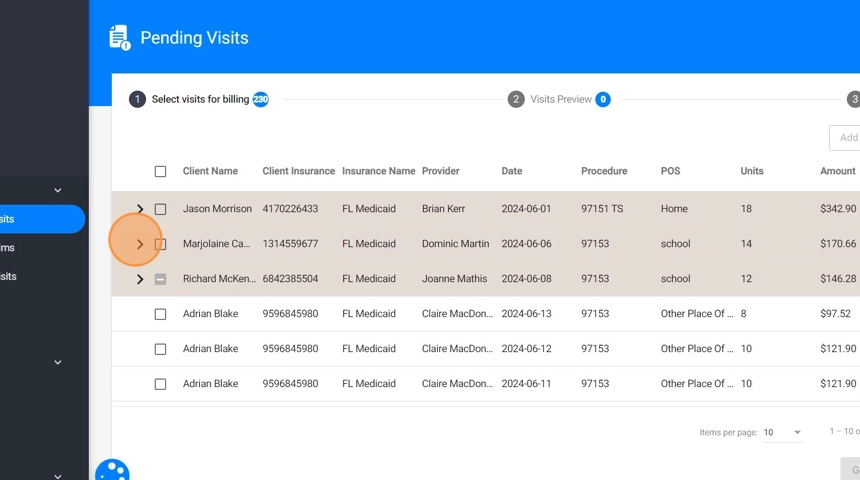
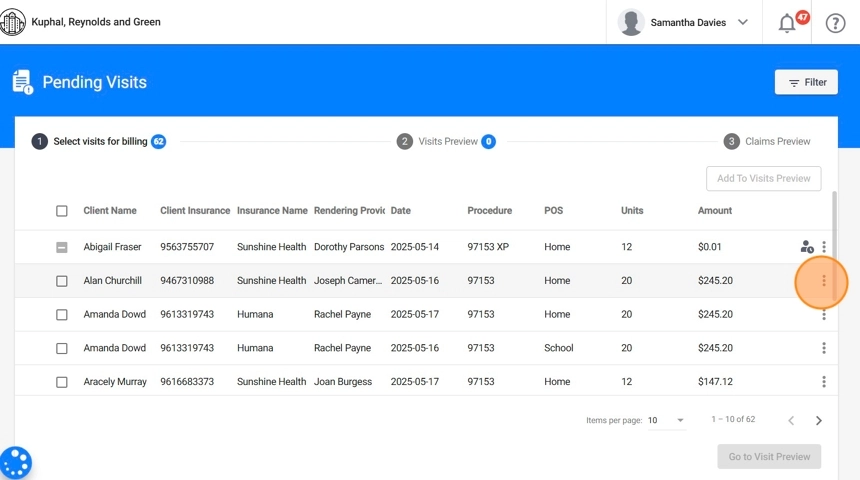
Step 1. Select visits for billing:
Start the process by selecting the visits you want to bill
2. In this view, you can access all agency visits that are ready and pending for billing. The notification clearly shows the number of visits available for billing.
By default, only completed sessions are available for billing. However, we can configure an alternative condition for you if needed:
- Session must be submitted: Allows billing after the session is submitted (even if not signed by the caregiver or reviewed by the analyst/administration).
- Session must be submitted and signed by the caregiver: Adds an extra compliance step: requires caregiver signature.
- Session must be signed by the therapist and the caregiver: Full dual-signature validation before billing is permitted.
- Session must be signed by the therapist: Only the therapist’s signature is required.
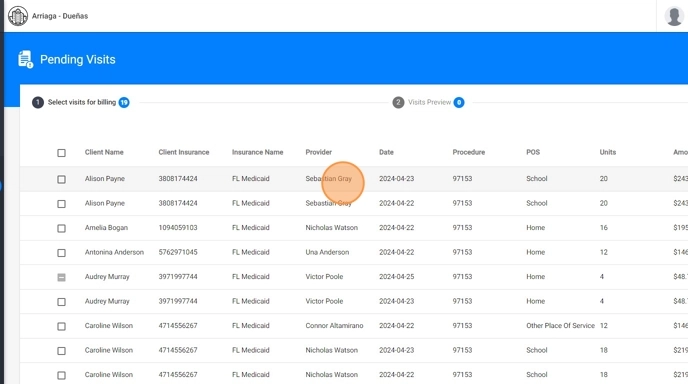
3. By clicking on each visit you can see its details
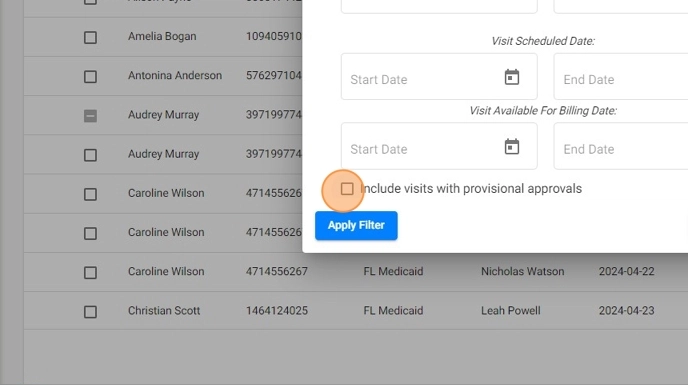
* Filter the visits
4. You can use the "Filter" option to help you select the visits you want to bill.
Filters include client, insurance, therapist, procedure, and Visit Scheduled date.
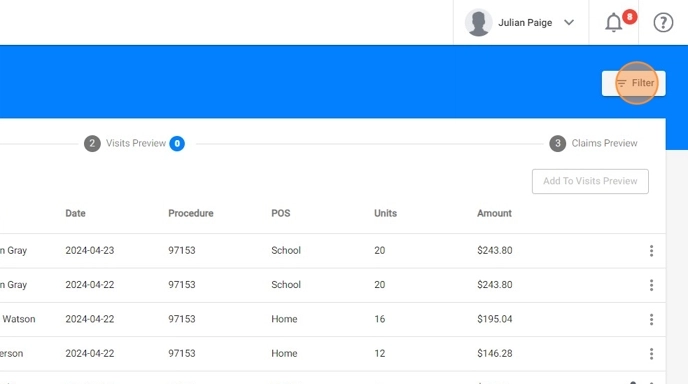
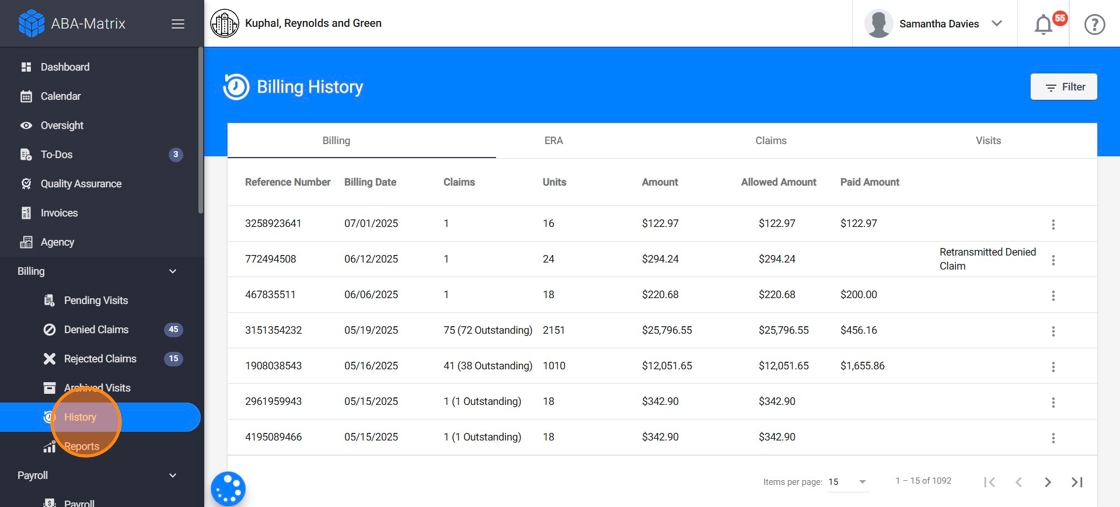
If you input only the end date of the current billing period and leave the start date empty in the "Visit Scheduled Date" filter, you will see all visits up to that date, including any that were missed in previous billing periods. This ensures that all visits ready for billing are included up to the selected end date.
5. By default, visits with provisional approvals will not be displayed, but you can include them in the filter by checking the 'Include visits with provisional approvals' checkbox.
Even if you include them in the filter, you won't be able to bill those visits until you add the PA number of the authorization
* Send the visits to the next step
6. After filtering the visits, you can select the ones you want to bill, either individually or all at once.

7. Then click "Add To Visits Preview" to send them to the next step: Visits Preview
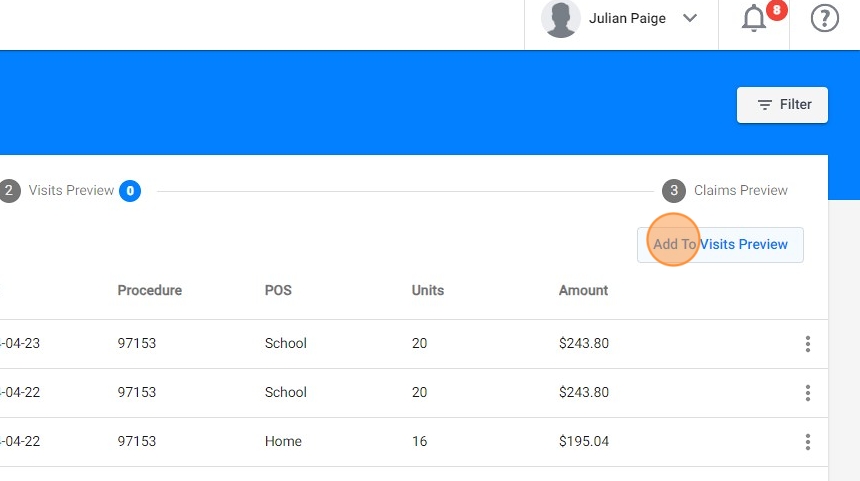
8. After sending all the sessions you want to bill to the second step, click "Go to Visit Preview" to proceed

Step 2. Visits preview
9. From this view, you can review the visits and remove any that you do not want to send.
Click "Go to Claim Preview" to go to the next step
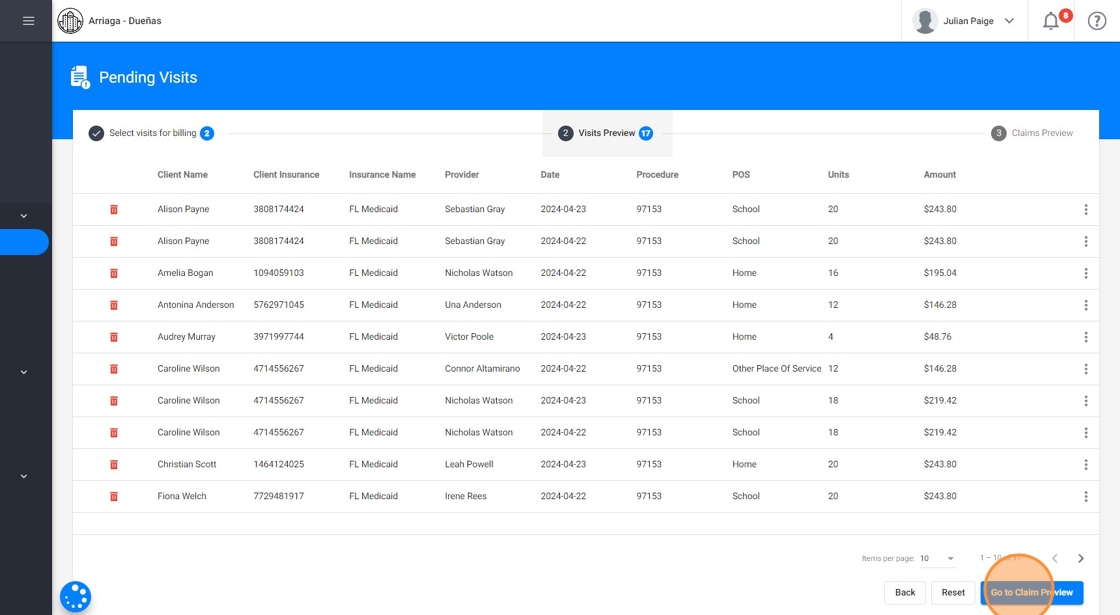
When a visit is removed from this view, it will be available again in the previous step
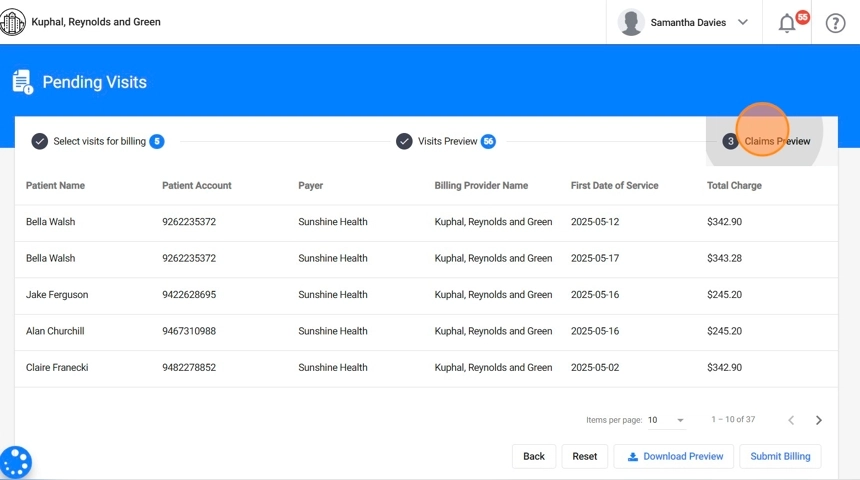
Step 3. Claims Preview
* Review the claim information
10. Each line in the preview represents an individual claim. For a closer look, simply click on a line to access detailed information, including service codes, dates, etc.
11. 🔧 How Claims are created from system data
Each claim in the Claims Preview is automatically generated using real-time data. The system consolidates all relevant information to populate the claim accurately and efficiently, taking data from the following sources:
- Visit information: Includes the date and time of service, Place of Service (POS), CPT code (based on the linked service), and units (calculated from visit duration and service configuration).
- Client profile: Pulls key details such as the client’s full legal name, date of birth, authorization (PA) number, and insurance member ID.
- Therapist information: Captures the rendering provider’s name and NPI.
- Insurance configuration: References the billing provider’s agency name, NPI, claim format, and rate tables associated with the selected insurance.
You do not need to manually enter any claim fields, the system automatically compiles all necessary billing data from the visit, client, therapist, and insurance records. This level of automation streamlines the billing workflow while ensuring accuracy and alignment with payer requirements.

12. If you prefer to review multiple claims at once, click Download Preview to export the data into a neatly formatted Excel file. This allows you to analyze the claims easily before final submission.

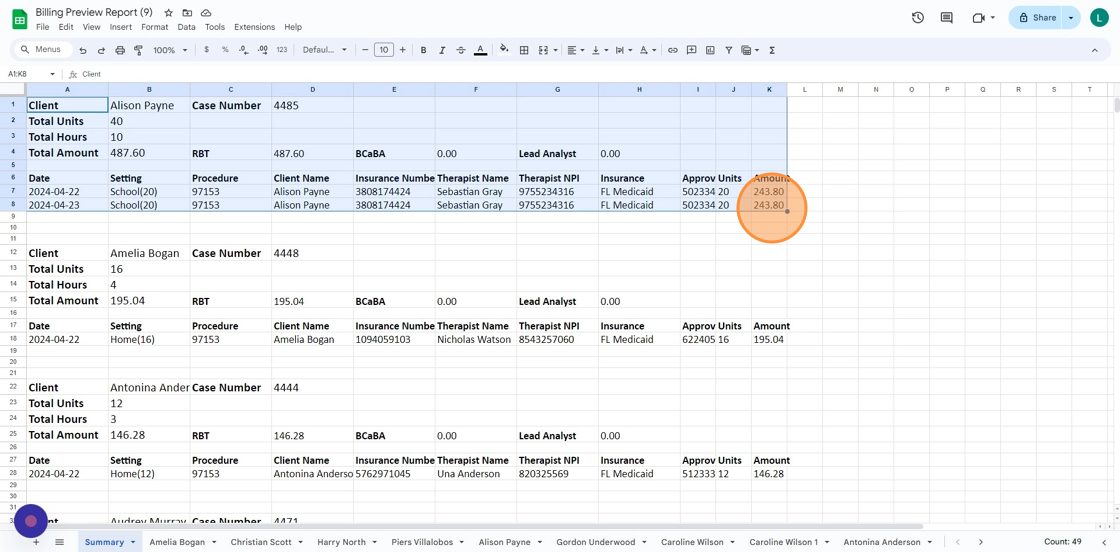
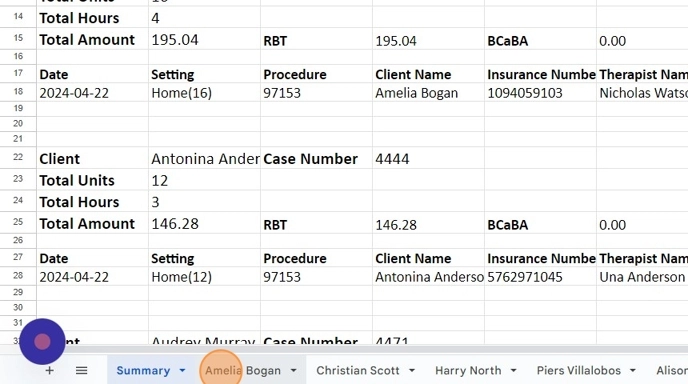
13. In the first page of this report you can find the Summary page overview:
The summary page provides an overview of all clients selected for billing, with key information that includes:
- client name
- total hours and units ready for billing
- total expected insurance payments, and a breakdown of payments per certification.
- Detailed information about each visit, such as date, place of service, code, units, etc.
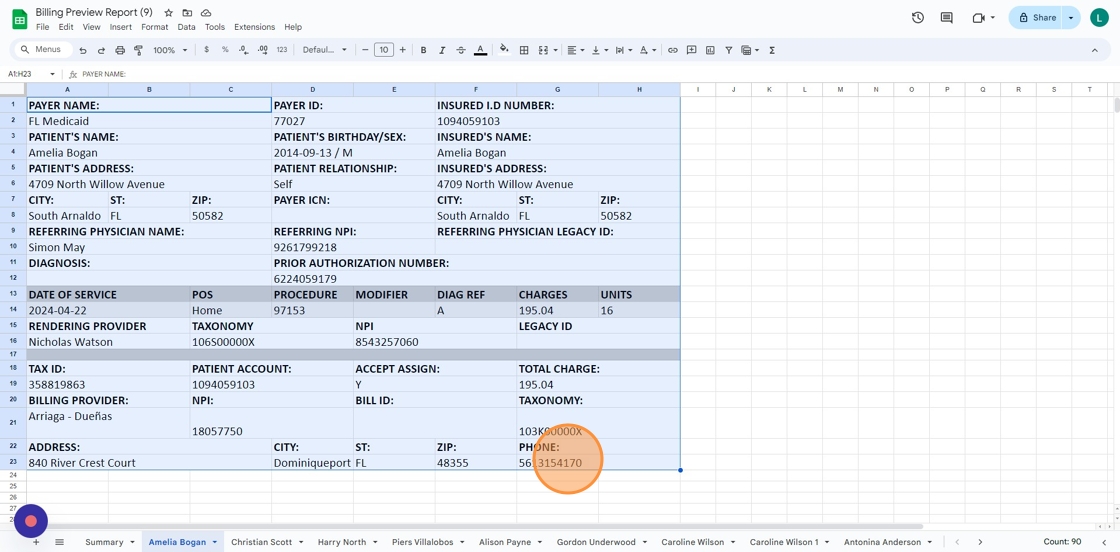
14. The billing preview report also includes a detailed page for each claim.
15. The Detailed Claim Page is especially handy for agencies using the clearinghouse integration. Here, users can check the exact details used to create claims before sending them to the clearinghouse.
With this feature, users gain clarity on the exact data being forwarded
* Submit billing
16. Once you've reviewed the information and are ready to proceed, click "Submit Billing".

When you click "Submit Billing," there are two possible outcomes according to your billing configuration:
- Local Billing: By default, the billing is processed locally, meaning the information remains within the system. In this case, the user must use the billing report to manually enter the claim details into the insurance portal.
- Integrated Billing: With this feature enabled, claim data is electronically transmitted to a clearinghouse (ClaimMD), which then submits the claims directly to the insurance providers.
If you want to enable the last option, you need to create an account with the clearinghouse. Please contact us for more information.
* Billing report
17. When you submit a billing, regardless of the billing configuration (local or integrated), the system will generate a Billing report, which will be downloaded to your computer automatically.
The first page of this report will have general Billing information.
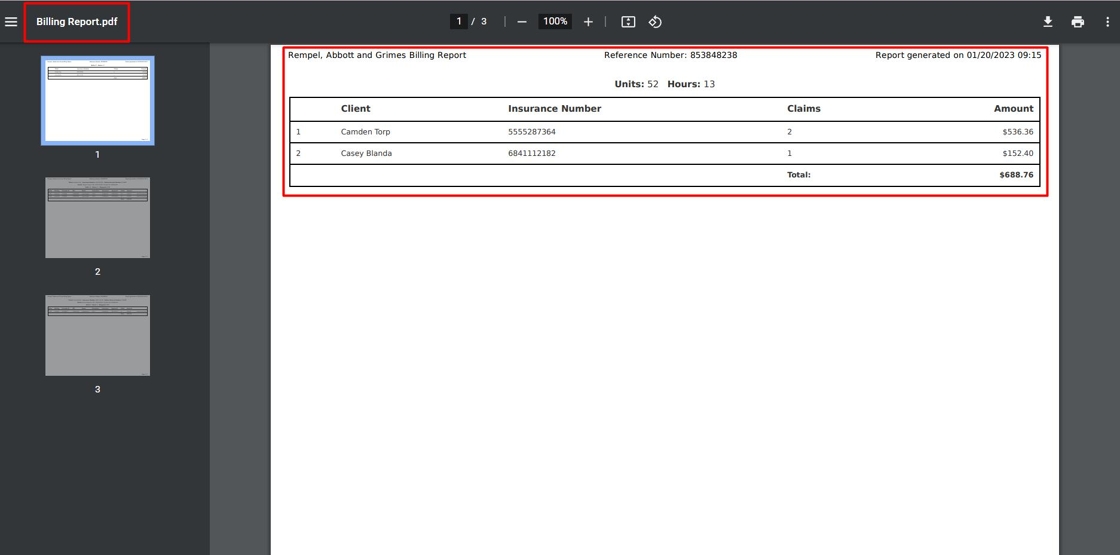
18. The report also contains a more detailed page for each client.

This report can be used by agencies with local billing to manually enter information into the insurance portal.
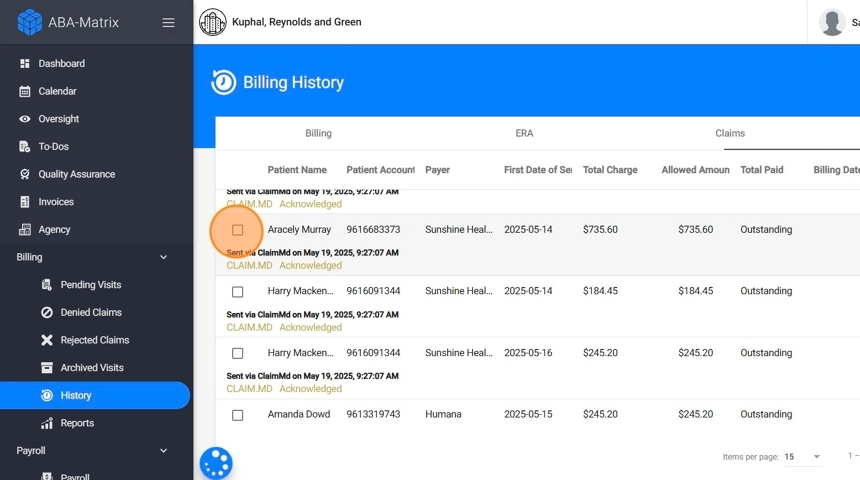
SECTION BILLING HISTORY: Claim monitoring
19. Under the Billing History section, you’ll find four tabs, each providing details about the billing activity in your agency:
- Billing: Displays a list of all billing batches that have been generated, along with their statuses and submission details.
- ERA: Shows Electronic Remittance Advices received from Claim.MD.
- Claims: Lists all submitted claims and their current statuses.
- Visits: Contains a record of billed visits.
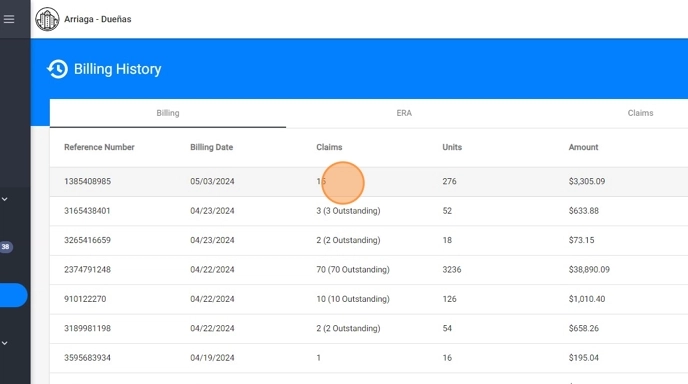
1. Billing
20. The Billing tab provides a comprehensive overview of all the billing batches your agency has submitted. This section is especially useful for auditing, reconciliation, and tracking overall billing performance over time.
Each row in this view represents a distinct billing batch, and includes the following key fields:
- Reference Number: A unique ID generated by the system for each billing run. You can use this to quickly search, track, or reference specific batches.
- Billing Date: The date the billing batch was submitted.
- Claims: Total number of claims generated in the batch.
- Units: Sum of billed units across all claims in the batch.
-
Amount: Total amount billed for that batch (based on procedure rates).
Allowed Amount: The total amount expected based on payer contracts. This section will remain empty until the system receives the ERA (if you're using Integrated Billing) or until the claim is manually posted (for agencies using Local Billing).
- A red down arrow appears in the Allowed column when the allowed amount is lower than the Amount billed.
- Paid Amount: The total reimbursed amount received via ERA, if integrated billing is used. For local billing, by default this will remain empty unless updated manually.
This section serves as a dashboard for all your agency’s billing activity and allows you to quickly assess the performance and outcomes of each billing run.

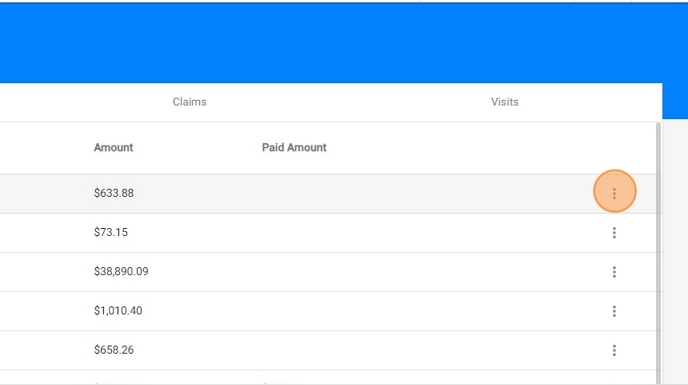
21. You can download the billing reports:
- Click the three dots at the right side of the billing batch you want to download.
- Select the report:
- PDF Billing report
- Excel Billing report
- CSV Report (list with all the billed sessions and its details)
You can use the filter tool to quickly locate a specific billing group. By specifying a date range, you’ll be able to view all billing reports generated within that period. Additionally, you can use the Search by Reference Number feature to find a billing batch directly.

* Viewing Billing Group Information: Billing Batches
22. LOCAL BILLING
If your agency uses local billing, you are responsible for manually posting payments and adjustments after submitting the claims. This should be done based on the responses received from each payer.
Until you update this information manually, the claims will appear as Outstanding in the system, and the Allowed and Paid amounts will remain blank.
The system includes a setting that allows claims to be automatically marked as paid upon processing a local billing batch. This can be configured under Agency Settings > Billing by enabling the Local Billing Auto-Posting option.
23. For detailed instructions on how to manually reconcile claims, including how to post payments and apply adjustments, refer to the Manual Posting of Claims guide
24. INTEGRATED BILLING
When using billing integration, claims will appear as Outstanding and the Paid amount will remain empty until the ERA is received in your Claim.MD account.
Once the ERA is received, the payment information is automatically posted in the system, updating the claim status and filling in the Paid and Allowed amounts accordingly.

The Integrated Billing feature offers a seamless and automated billing experience by transmitting claims directly to the clearinghouse and pulling back payment data via ERAs. With this integration, you can:
- Reconcile Payments Automatically: As ERAs are received, the system automatically matches payments to the corresponding claims, updating their status and recording paid amounts and adjustments.
- Track Payment Status in Real Time: You can monitor claim outcomes, and see which claims have been paid, are pending, or require attention.
- Handle Denials and Adjustments Efficiently: The system flags denied, rejected or partially paid claims and displays detailed messages from the payer. This helps you quickly identify issues, make corrections, and resubmit if needed.
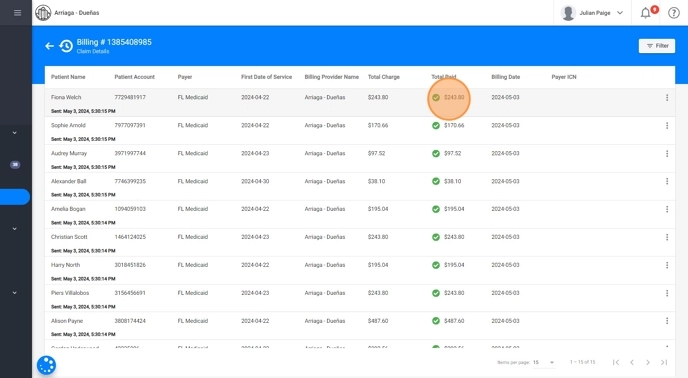
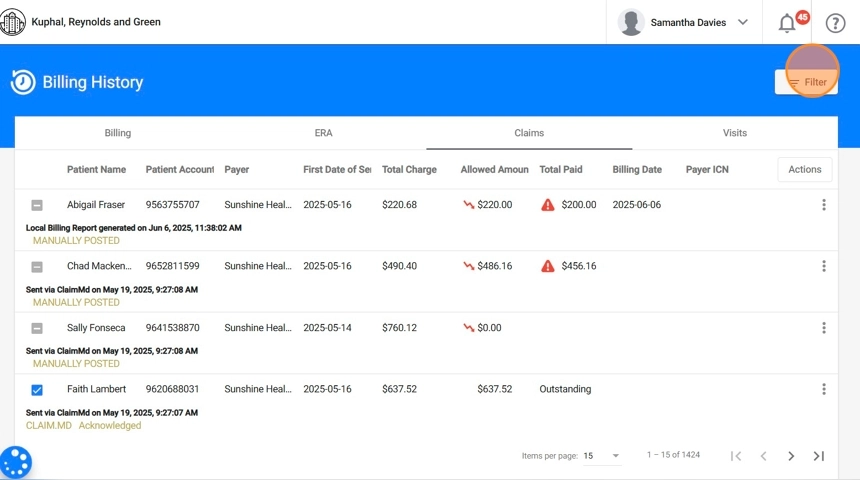
* Viewing Details inside each Billing group: Claims overview
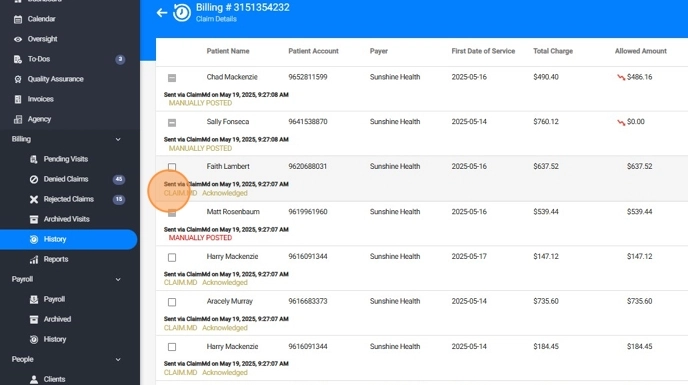
25. By clicking on any billing group listed in the Billing tab, you can access detailed information about the claims included in that batch.
This quick-view panel provides essential fields to help you verify status, payments, and claim identifiers. Here's what each field represents:
- Patient Name: The full legal name of the client associated with the claim.
- Patient Account: A unique ID
- Payer: The insurance company responsible for processing and reimbursing the claim.
- First Date of Service: The earliest service date included in the claim.
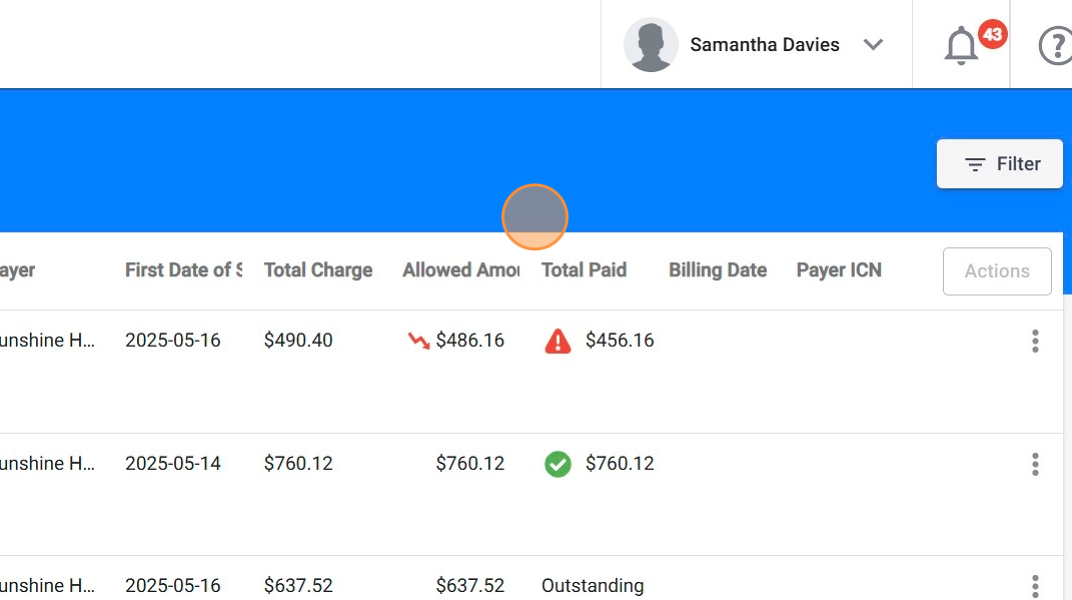
- Total Charge: The full billed amount based on your agency’s rates and the services rendered.
- Allowed Amount: The maximum reimbursement amount determined by the payer, based on contracted rates or fee schedules. This field is populated once the ERA is received or the claim is manually reconciled.
- Total Paid: The amount actually reimbursed by the payer. For integrated billing, this is filled in automatically upon ERA import; for local billing, it must be entered manually.
- Billing Date: The date on which the billing group was submitted.
- Payer ICN: The Internal Control Number (ICN) assigned by the insurance company. This identifier appears after the ERA is received, or can be entered manually.

26. 📌Identifying Claim transmission type:
For each claim in a billing batch, the system clearly indicates whether it was submitted manually or through the integrated billing process. This helps you understand how the claim was delivered and what follow-up actions may be required.
You’ll see messages such as:
- “Sent via ClaimMD on [date]”: This means the claim was submitted electronically using the integrated billing feature.
- “Local Billing Report generated on [date]”: Indicates that the claim was transmitted manually.
This label is helpful for tracking how claims were handled and ensuring the appropriate reconciliation method is used later.

27. 📌Viewing Claim feedback and processing status:
Once a claim has been submitted, the Latest Message field provides real-time updates about its progress and any system responses. These updates help your billing team stay fully informed about each claim, from submission through resolution.
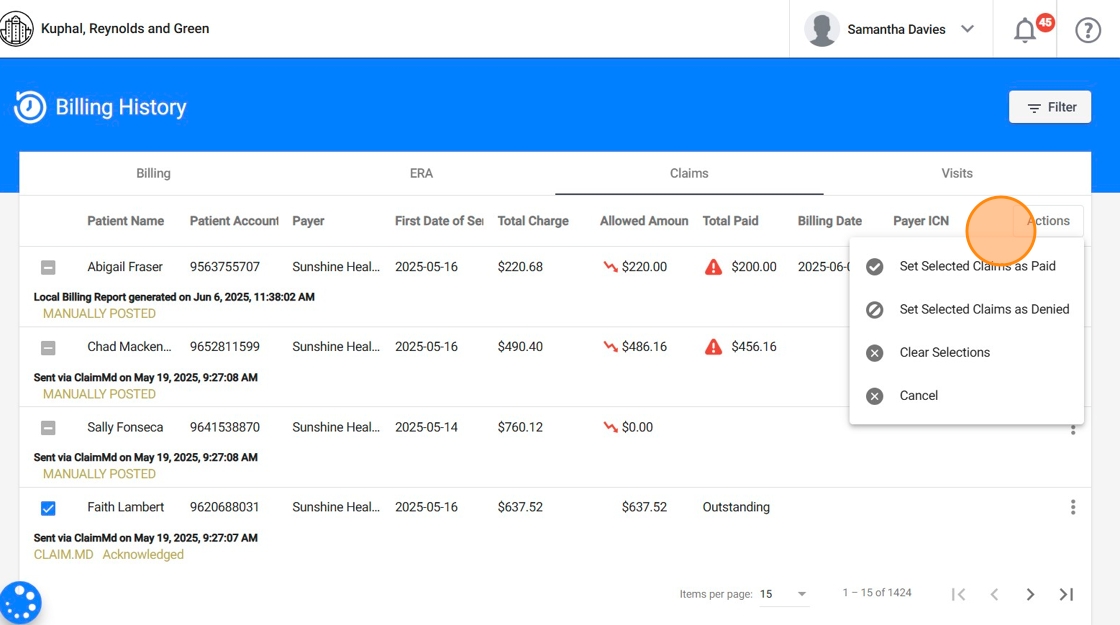
28. 📌Claim Actions (Manual Reconciliation):
When the ERA is unavailable or billing is processed locally, you can take direct action on your outstanding claims:
- Mark claims as Paid, and enter payment details including the Paid Amount and optional Payer ICN.
- Apply adjustments, specifying the Adjustment Amount, Code, and Adjustment Group.
- Classify claims as Denied or Rejected based on the payer’s response.
- Enter denial details, such as error messages and claim status explanations.
These tools help ensure financial accuracy and give you full control over the reconciliation process when automation isn’t available. For detailed, step-by-step instructions on manually reconciling claims in ABA Matrix, refer to the Guide to Reconciling Claims Manually
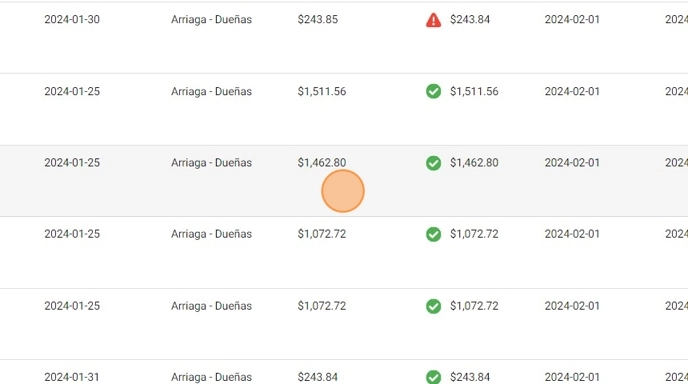
29. 📌Understanding visual indicators:
The system provides built-in visual cues to help you assess the financial outcome of each claim at a glance. These indicators appear whether the claim was automatically posted after receiving the ERA or manually posted.
- Allowed Amount: When the allowed amount is less than the total charge, a red arrow icon will appear beside the value. If the claim hasn’t been posted yet (ERA not received or no manual entry made), this field will remain blank.
- Total Paid: Reflects the amount actually reimbursed for the claim:
- Claim Fully Paid: When the total paid matches the allowed amount, and no adjustments were applied, the system displays a green checkmark ✅, indicating the claim has been fully reimbursed.
- Partial Payment: If the total paid is less than the allowed amount, the system displays a red alert icon ⚠️, signaling that adjustments (such as patient responsibility) have been applied. You can click into the claim to view detailed adjustment entries, including reason codes and group classifications, either from the ERA or manual posting notes.
These indicators give your team quick visibility into claim performance and help you focus attention where follow-up may be needed.
* Viewing Details inside each Claim: Claims information
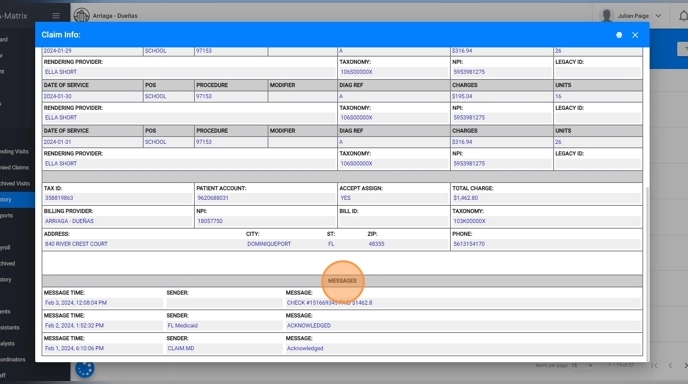
30. In addition to the claims overview within each billing group, you can view the details of an individual claim by clicking on it.
31. From this view you can access a complete audit trail of the claim’s lifecycle, including transmission messages, ERA data, and adjustments.
- Messages: This section shows a chronological list of key events and updates throughout the claim’s transmission and processing. You may see entries such as acknowledgements from ClaimMD or the payer.
- ERA: When an ERA has been received for the claim, the system displays key remittance fields. This includes the Check Number, the Status of the claim, the Total Paid, the Paid Date and the Payer ICN.
- Adjustments: You’ll see the Date the adjustment was made, the Procedure, the Amount that was adjusted, the Adjustment Code and Group category it falls under, and a brief Description explaining the reason for the adjustment.
These messages help you understand when and how the claim was submitted, and what feedback was received during its journey.
2. ERA
32. Under the ERA tab you will see a record of all the ERAs made available in your Claim.MD account. By clicking on any of those ERAs you can view the details
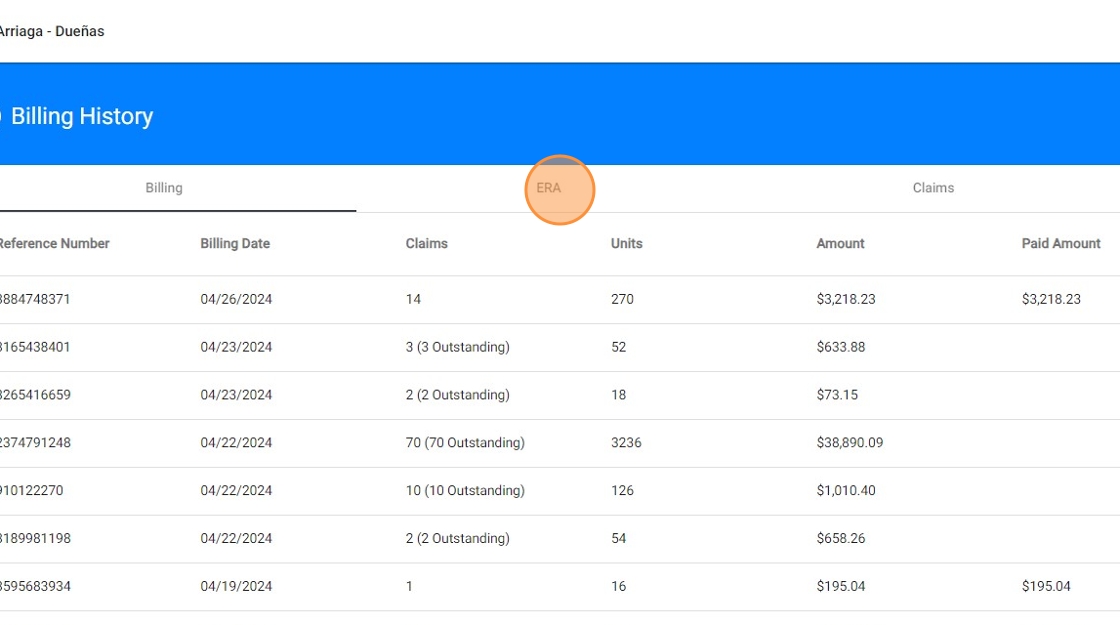
33. You can download the PDF version of ERAs (as shown in your Claim.MD account)
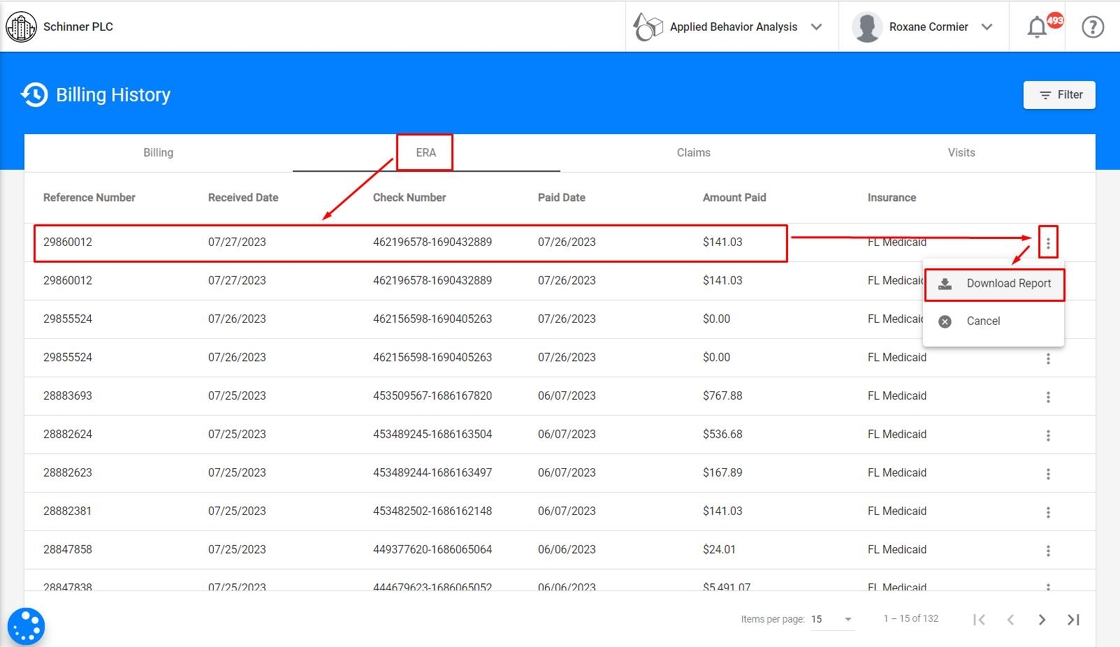
You can filter by Payer ID and received date of the ERA, and you will see all ERAs within the applied selection.

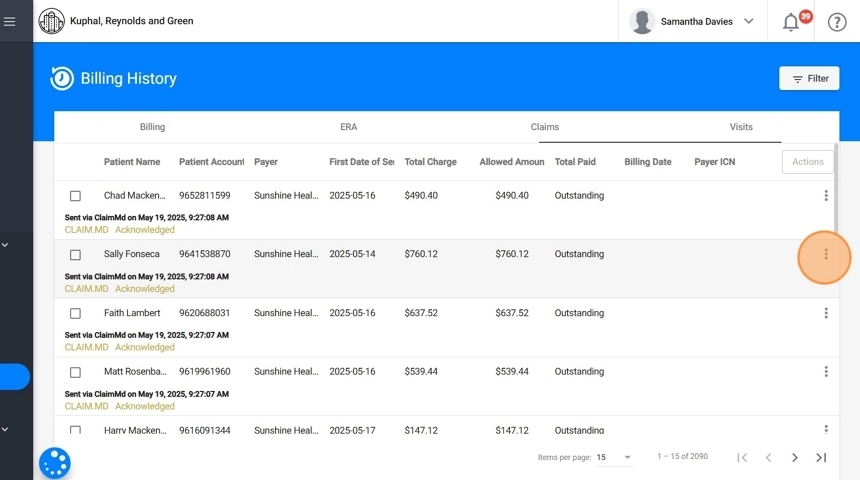
3. Claims
34. Beneath the Claims tab in Billing History, you’ll find a centralized list of all claims that have been processed through the system, regardless of which billing batch they originated from. This section serves as a global overview of every claim submitted by your agency, whether through integrated billing or local billing.
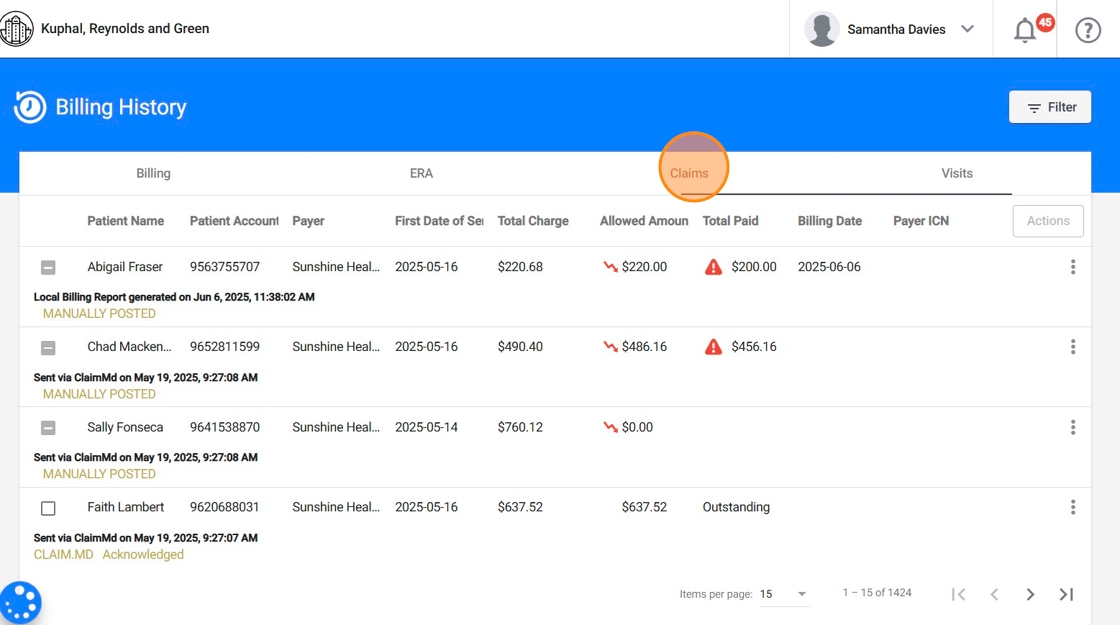
35. It displays the same information available in the claims overview inside a specific billing batch, but expanded to include all claims across the agency. From here, you can view key details at a glance and access the full claim information by clicking on any claim row.

36. This view includes the same claim management actions.
37. You can filter by Billing reference number, clients, first day of service or billing date, and you will see all claims within the selection applied.
You can also filter claims by status:
- Paid: Successfully processed and reimbursed.
- Outstanding: Submitted but not yet finalized.
- Denied: Processed but not paid.
- Rejected: Not processed due to validation errors.
This filtering simplifies daily follow-ups, aging report reviews, and claim reconciliation.
* Real-Time Claim Status
38. If you use the Billing integration, this feature allows you to retrieve the most current status information for claims directly from the payer, without waiting for the ERA.
This feature is especially useful for claims that remain outstanding for several days, providing immediate insight into their processing status and helping reduce delays in follow-up or payment reconciliation.

39. Whenever you see a claim that has been marked as Outstanding for 3 or more days, you can check its real-time status directly from the system. To do this:
- Click the three-dot menu on the right side of the claim
- Select "Check Claim Status"
- A modal window will display the most up-to-date information provided by the payer
- The response is also stored as a message in the claim’s communication history
Important Notes:
Only certain insurances support this feature. To check supported payers, visit this link and filter by:
- Real-Time Claim Status: Yes
- Enrollment: Not Required
If the payer does not support real-time updates, the "Check Claim Status" option will not appear
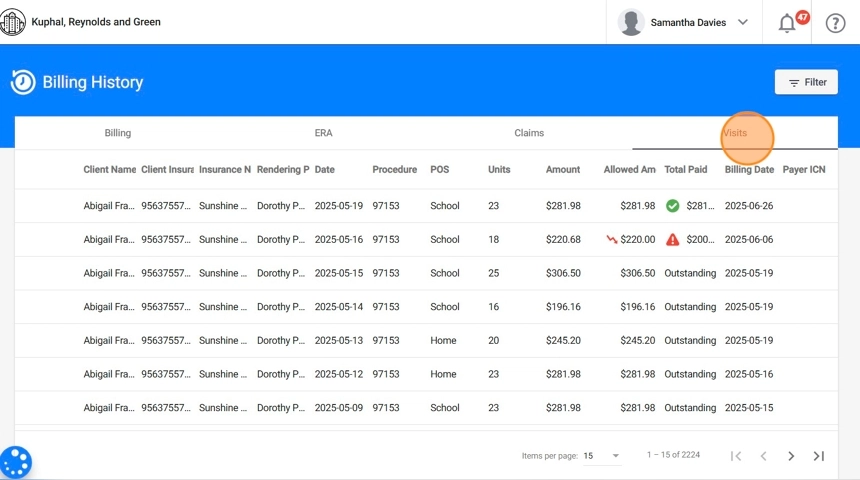
4. Visits
40. In the Visits tab within Billing History, you can view a complete list of all billed visits across your agency.
For each visit, the system displays essential billing details, including the client name, client insurance, insurance name, rendering provider, service date, procedure code, POS, units, billed amount, allowed amount, total paid, billing date, and payer ICN.
This centralized view helps you quickly verify the billing status of individual visits and supports efficient tracking and reconciliation.

41. You can filter by Billing reference number, clients, therapists, insurance, procedure, visits dates (scheduled, available for billing or billing), and you will see all visits within the selection applied.

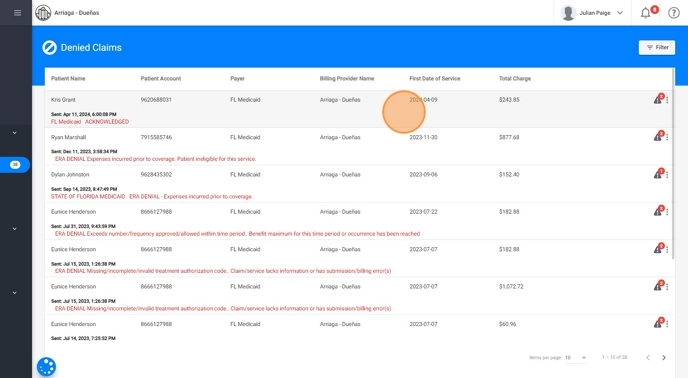
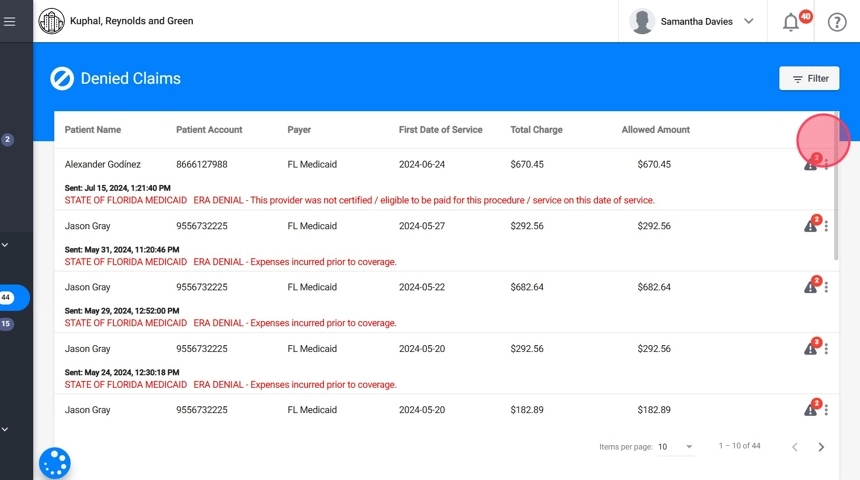
SECTIONS DENIED/REJECTED CLAIMS: Working with Denied and Rejected Claims
42. The system separates denied and rejected claims into two distinct sections to enhance visibility and help billing teams prioritize their workflows based on the type of issue.
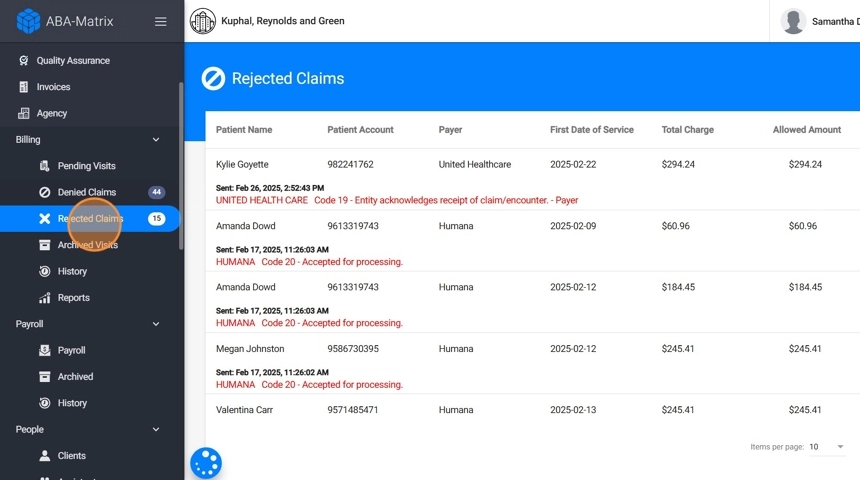
43. Rejected claims are claims that did not pass the clearinghouse or payer’s initial validation checks.
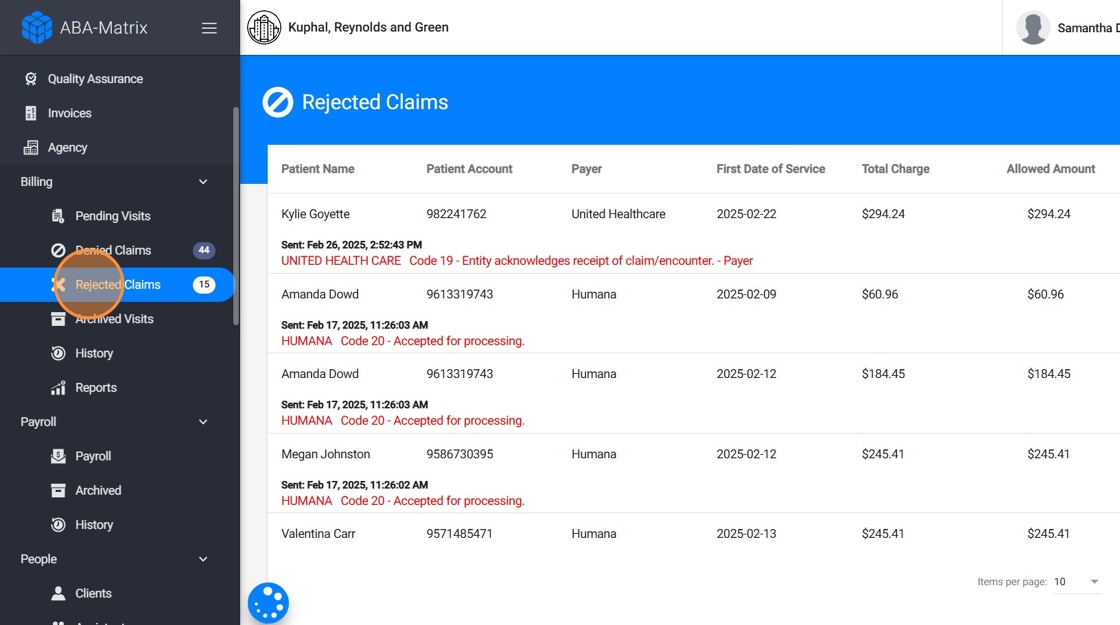
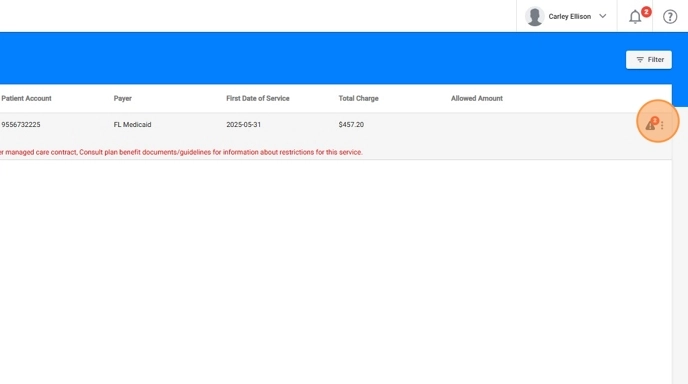
44. Denied claims, on the other hand, were successfully received and processed by the payer but were not approved for payment
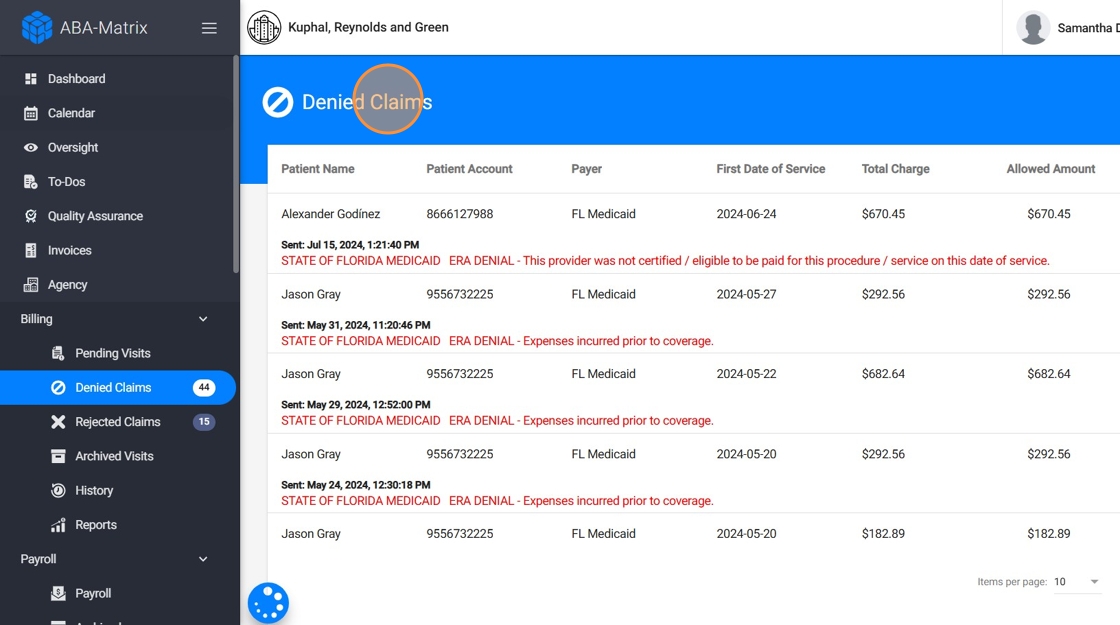
45. By clicking on a denied or rejected claim, you can view key details explaining why it was not accepted by the payer.
* Handling Denied Claims
46. When dealing with denied claims, you have three options to address and resolve the issues:
- Fix the issue in the Insurance Portal and Set the claim as Paid in our system:
- From the insurance portal you can correct the necessary information
-
Once the information is corrected and the claim is accepted by the insurance, mark the claim as paid in our system.
Fix the issue in Claim.MD and Set the claim as Paid in our system:
- Access your Claim.MD a.count and make the necessary corrections to the claim information.
- After making the corrections and ensuring the claim is accepted, set the claim as paid in our system.
- As with the insurance portal, update the information in our system to avoid recurring issues.
47. 3. Fix in Our System and Resubmit
-
Correct the claim information directly within the system.
Once updated, resubmit the claim from the same screen:
- as a new claim, or
-
as a corrected claim
(based on the payer’s requirements)
- The updated claim will be automatically sent to your Claim.MD account.
In the system, claims can be submitted either as new or corrected, depending on the payer’s requirements.
When resubmitting as corrected, the system will automatically include:
- The original ICN (Internal Control Number) from the ERA
- The correct frequency code required for resubmission
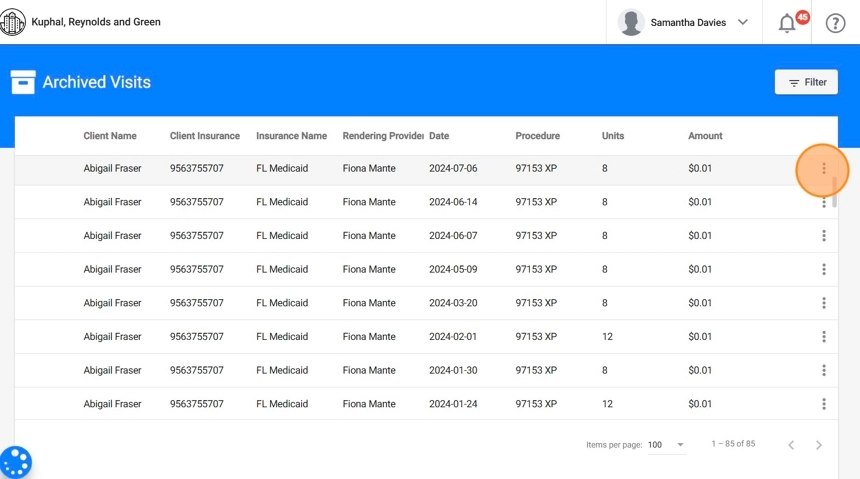
SECTION ARCHIVED VISITS: Handling Archived Visits
48. You can also archive a claim or visit. Archiving allows you to remove specific items from the active billing workflow without deleting them, helping keep your workspace organized.
- You can archive a visit that is still pending billing from the Pending Visits section.
- You can also archive a claim from the Denied or Rejected sections if it no longer needs to be processed.
49. Archived items remain accessible for future reference in the Archived Visits section within the Billing module, where they can still be viewed or restored if needed.

50. How to Unarchive a visit
- Go to the Archived Visits section.
- Select the visit you wish to bring back to billing.
- Use the Unarchive option to return it to the active billing queue.
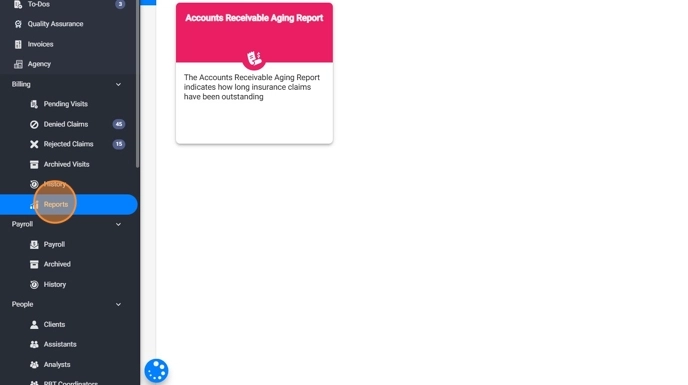
SECTION BILLING REPORTS: Using Billing Reports for Oversight and Follow-Up
51. You also have access to billing reports, such as "Accounts Receivable Aging Report". This report provides a categorized view of how long insurance claims have remained outstanding, enabling agencies to identify delays and take timely action to follow up with payers. It breaks down receivables into aging buckets, helping prioritize efforts based on the age of unpaid claims.
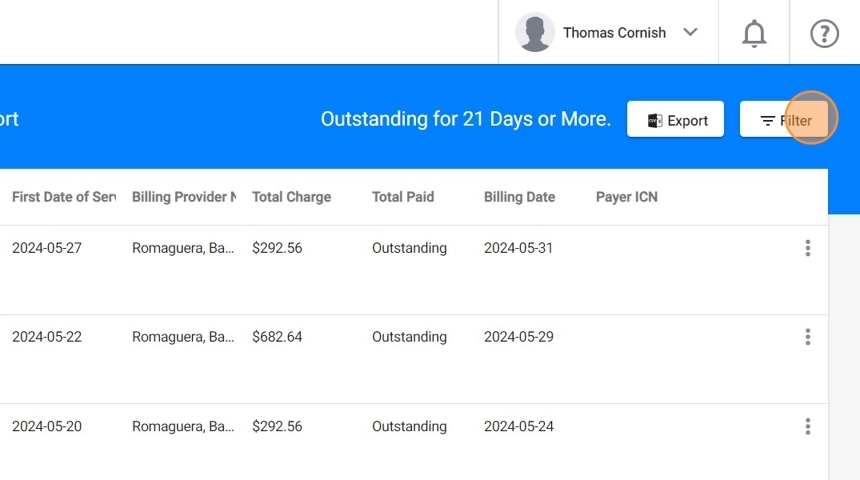
52. By default you will see outstanding claims for 21 Days or More.
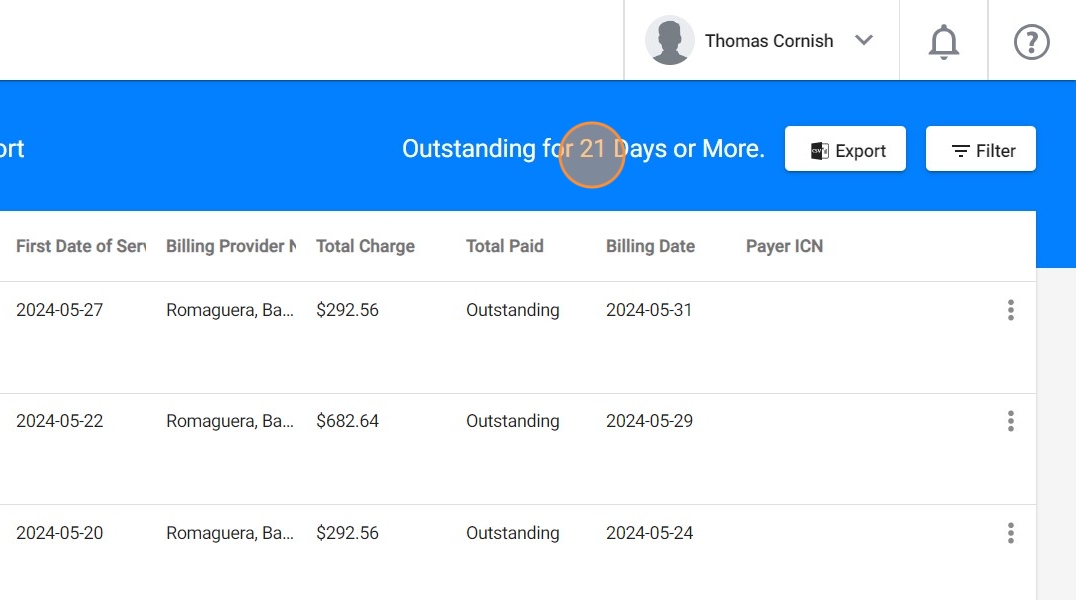
53. Click "Filter" to use different parameters, like:
- Days outstanding
- Insurance
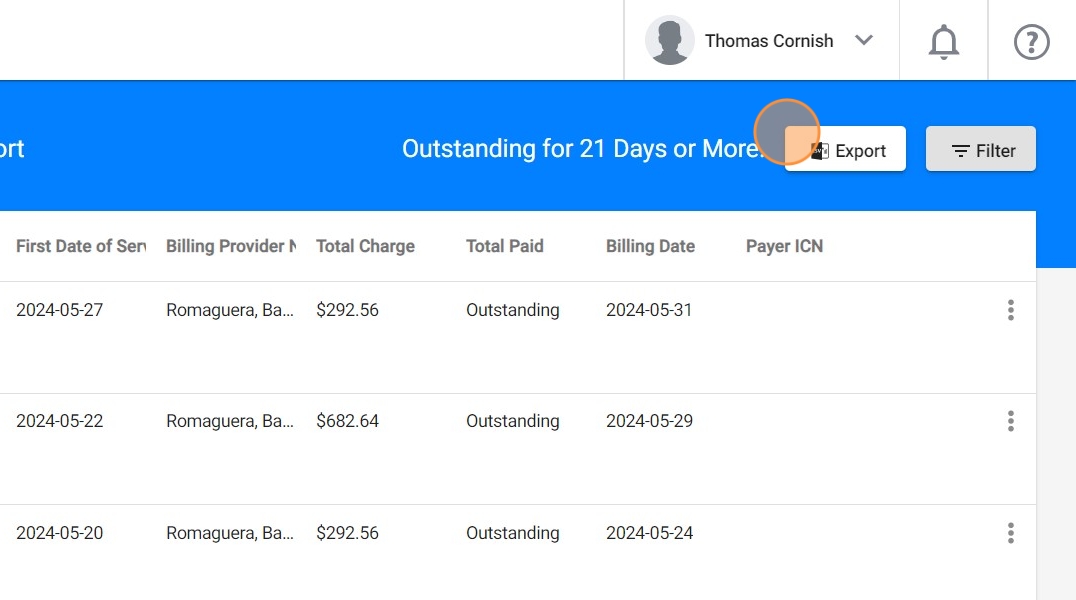
54. You can also export the aging report
Post Claim statuses directly: You can manually post claims as either Paid or Denied from within the Aging Report, streamlining reconciliation without navigating away from the report view
POST-BILLING CHANGES: Visit updates after billing
Once a visit has been sent to billing, only office staff members are authorized to modify the date, time, or Place of Service (POS).
Because these changes can impact the billing process, the system handles them differently depending on when the updates are made.
1. Changes Before Billing
55. Pending Visits
If the date, time, or Place of Service (POS) is updated while the visit is still in the Pending Visits section (ready for billing but not yet billed), the changes will be automatically reflected in the system, no additional action is required.
2. Changes After Billing
56. Post-Billing Updates
If any changes are made after a visit has been billed, the system will automatically generate a billing update to reflect the modifications.
57. Identifying visit updates:
Billing updates are easy to identify in the system, as they are highlighted in a different color for quick visibility.
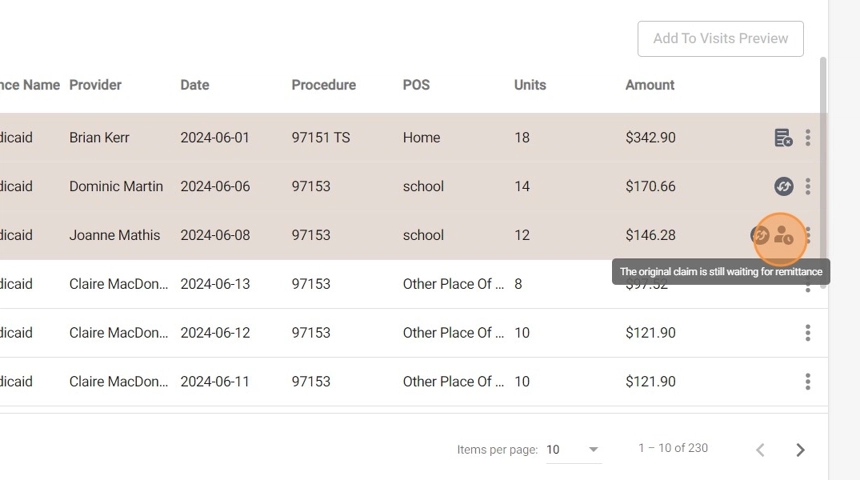
58. Understanding visit updates:
Updates will be marked with an icon on the right side of the visit. Hovering over the icon will display a notification explaining why the visit appears different and providing basic details about the update.
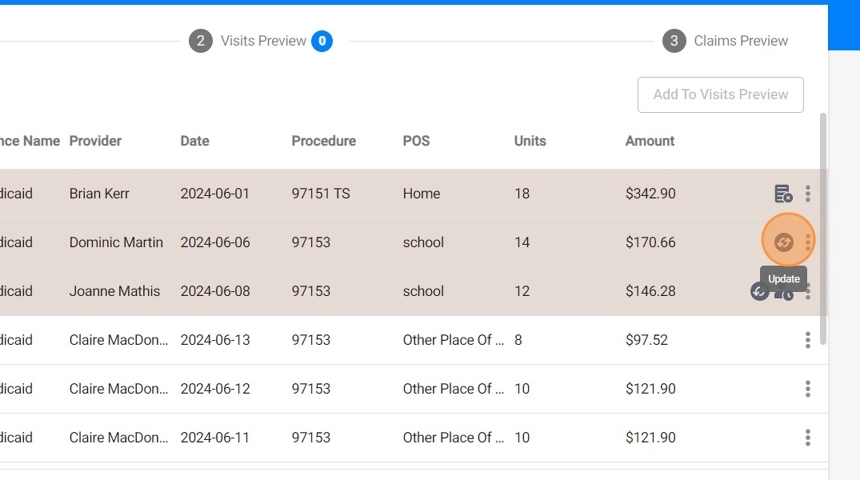
59. Comparing visit changes:
To view the original visit details alongside the updated information, click the arrow next to the visit. This feature allows you to easily compare both versions and understand what changes were made.
60. Depending on the nature of the change, the system will generate one of the following update types:
- - Update: Triggered when the date, time, or POS is modified.

61. - Void: Triggered when the visit is deleted.

62. Special Considerations for Billing Integration Users:
For agencies using the billing integration feature, billing updates cannot be processed until the ERA is available in your ClaimMD account.
Once the ERA is received and the original claim’s ICN is registered in our system, you’ll be able to proceed with billing the updated visit information.
If the original claim was manually posted in the system, and an adjustment is later generated, you’ll need to:
- Manually transmit the adjustment, and
- Manually mark it as paid in the system.
This is necessary because the system relies on automated tracking through ClaimMD for integrated claims. When the original submission wasn’t posted via the integration, there is no ICN or ERA reference available for automatic linkage.
63. Manually Marking a Visit as Paid (from Pending Visits):
If a visit is in the Pending Visits section and needs to be recorded as paid outside of the standard billing process (such as an adjustment to a manually posted claim that was originally transmitted through the integration but must be billed manually) you can mark it as paid manually.
- Go to the Billing module and open the Pending Visits tab.
- Locate the visit you wish to mark as paid.
- Click the three-dot menu (⋮) next to the visit.
- Select “Set as Paid”.
64. What happens next:
- The visit will be marked as paid in full, with no partial payment or claim details attached.
- It will automatically move to the "Visits" tab under Billing History.
Since no claim is generated or submitted for manually paid visits, this action is final and informational only
Changes before Billing:
- Navigate to the pending visits.
- Make any necessary changes to the date, time, or POS.
- The system will automatically update the visit information.
Changes after Billing:
- Access the visit that needs to be updated.
- Make the required changes to the date, time, or POS.
- The system will generate an update or void based on the changes.
- If using billing integration, wait for the ERA before proceeding with billing the update.
This process ensures that all visit information is accurately maintained and billing updates are properly managed to reflect the changes made by staff members.